
TL;DR
Listen free for 30 days with Audible
Thousands of audiobooks and originals — cancel anytime.
Start your free trialAs an affiliate, we earn on qualifying purchases.
Caring for your tripod at the beach means keeping locks above sand and surf, rinsing fully extended legs with low-pressure fresh water, and letting every section dry before collapsing it. Sand grinds moving parts while salt attacks metal hardware within hours, so same-day cleaning matters more than whether your tripod uses aluminum or carbon fiber.
One un-rinsed afternoon beside the sea can leave a tripod leg grinding, slipping, or locked solid the next morning. The camera support that felt smooth at sunset can sound like coarse sugar in a pepper mill after sand enters the joints and salt dries around the hardware.
A tripod is a mechanical device full of sliding tubes, threaded collars, cams, shims, screws, and springs. That is exactly the kind of hardware that sand and salt water destroy fastest. Carbon fiber does not give you a free pass, either, because its locks, fasteners, feet, and castings still contain metal and plastic parts.
This guide gives you a practical routine for caring for your tripod before, during, and after a coastal shoot. You will learn why collapsing gritty legs causes damage, how to rinse without driving debris deeper, when to dismantle the locks, and what to do when a joint already feels stiff. The goal is simple: keep your tripod moving with the quiet, controlled glide you expect when the light lasts only seconds.
Keep sandy lower leg sections extended until you can rinse them; collapsing them pulls abrasive grit into locks and bushings.
Rinse salt spray with low-pressure fresh water on the same day, even when the tripod never touched the surf.
Dry the tripod fully extended and never seal wet legs inside a padded carrying case.
Run locks clean and dry unless the manufacturer specifically permits a small amount of an approved lubricant.
Treat carbon fiber as corrosion-resistant tubing, not a corrosion-proof tripod; its fittings, screws, and locks still need care.
Caring for Your Tripod: Sand, Salt Water, and Maintenance
Sand grinds. Salt corrodes. Time compounds both. Keep dirty lower sections extended, rinse with low-pressure fresh water the same day, and let every tube dry before collapsing it.
Why a single sandy collapse can turn smooth legs into grinders
A tripod is a precision mechanical system disguised as simple support. Sliding tubes pass through narrow interfaces where even a small amount of grit can behave like lapping compound.
Every collapse becomes a grinding pass
Quartz-rich grains score tube walls and wear lock shims. In twist locks they grind threads and bushings; in flip locks they collect around pivots and abrade cam surfaces.
Invisible spray keeps working
Hygroscopic salt attracts moisture and attacks exposed aluminum, screws, springs, and fittings. Once dry, its crystals become another abrasive inside moving joints.
Mixed metals raise the stakes
Salt water bridges dissimilar metals—such as stainless screws in aluminum castings—and accelerates galvanic corrosion around the apex, feet, locks, and head mount.
Damage risk rises with delay and movement
Practical risk spectrumThe five-step rinse that stops salt working overnight
Keep the exposed grit outside the mechanism. A gentle top-to-bottom rinse should move contamination downward and away from the locks.
Keep legs extended
Do not retract sandy lower tubes through clean collars.
Rinse gently
Use low-pressure fresh water, never a hard jet.
Work downward
Clean apex, column, tubes, collars, feet, and spikes.
Cycle clean locks
Move each once after visible grit has washed away.
Air-dry fully
Leave sections open until joints and threads are dry.
Never seal a wet tripod in a padded case
Still, humid air holds moisture against metal hardware, rubber grips, fabric straps, and hidden threads. Transport it in an open tray, loose towel, or ventilated bag.
Five beach habits that keep grit below the locks
The safest cleaning routine begins before the shutter fires. Control where sand and water can reach, then move the tripod without feeding contaminated tubes into the joints.
Extend the thinnest sections first
Expose lower tubes while upper joints remain above splash and blowing sand.
Choose a firm footing
Use flat rock, compact sand, a stable board, or dedicated sand feet.
Keep locks above the waterline
Anticipate surges and reflected waves before joints become submerged.
Move before the legs sink
Flowing water can scour beneath a foot and bury the tube deeper each wave.
Carry the tripod open
Lift the whole setup clear rather than shortening contaminated sections.
| Design / material | Sand behavior | Salt vulnerability | Serviceability | Care verdict |
|---|---|---|---|---|
| Twist locks | Grit grinds threads and bushings | ~Hardware remains exposed | ✓Often easy to strip and wash | Run clean and dry |
| Flip locks | Cams and pivots collect grit | ~Open mechanism traps residue | ~Fast access, more adjustment | Brush pivots carefully |
| Aluminum tubes | Scratches breach anodized surface | ✗Can corrode where damaged | ✓Easy to inspect visually | Rinse every coastal use |
| Carbon fiber tubes | Surface and shims still abrade | ~Fittings and screws corrode | ✓Tubes resist corrosion | Not a maintenance-free pass |
| Sealed / “aqua” locks | Reduced ingress, not eliminated | ✓Improved resistance | ~Seal condition matters | Rinsing still required |
When rinsing is no longer enough
Grinding, uneven resistance, slipping, or white salt deposits mean contamination has reached working surfaces. Stop forcing the joint and move to a controlled teardown.
Open the lock when feel changes
A rough collar or inconsistent clamp is evidence, not an inconvenience. Continuing to cycle it can turn removable grit into permanent scoring.
Disassemble, wash, dry, reassemble
Follow the manufacturer’s component order. Keep shims and bushings oriented correctly, and service one joint at a time if parts look similar.
Lubricant rule: manufacturer guidance wins
Avoid petroleum grease and WD-40-style sprays. They can attract grit and may affect plastics or rubber. Most locks should run dry; where lubrication is explicitly permitted, use only a tiny amount of the specified product—often a compatible silicone grease.
One clean chain protects every moving surface
Keep grit outside
Extend low, place feet firmly, carry open
Flush contamination
Fresh water, low pressure, top to bottom
Remove moisture
Dry extended in open, moving air
Restore the glide
Quiet travel, firm locks, reliable support
Why One Sandy Collapse Can Turn Smooth Legs Into Grinders
Caring for your tripod starts with treating sand as an abrasive, not harmless dirt. Quartz-rich grains caught between two leg sections behave like lapping compound: every collapse pulls grit through the joint, scores the tube, and wears the lock surfaces that hold your camera steady [1].
The classic mistake happens when the light disappears and you pack in a hurry. Your lowest leg sections are dusted with damp sand, so you release the locks and push them straight into the larger tubes. You may hear only a faint dry scratching sound, but that sound means grit is travelling toward shims, bushings, and threads.
Twist and flip locks suffer in different places. In a twist lock, sand works into the threaded collar and rubs against the internal bushing; in a flip lock, it wears the cam surface and gathers around pivots. Either design can begin slipping because material has worn away, not because the lock merely needs tightening.
Think of the tripod leg as a telescope with a narrow doorway between each tube. Pushing a dirty section through that doorway is like dragging muddy boots across a polished wooden floor: one pass may leave a faint line, but repetition cuts a permanent path. Stop before collapsing whenever you see or feel grit.
Never force a gritty leg closed. Leave it extended, carry it away from blowing sand, and rinse or brush the exposed section before moving it through the joint.
During one windy shoreline setup, for example, a clean upper lock can remain smooth while the lowest collar turns rough within minutes. That difference tells you where the grit entered. Catching it at that stage usually means a rinse and basic cleaning; forcing the collar may turn a small nuisance into scored tubes or a damaged lock insert.
As an affiliate, we earn on qualifying purchases.
5 Beach Habits That Keep Grit Below Your Tripod Locks
Caring for your tripod at the beach means controlling where sand and water can reach before you press the shutter. Extend the lowest leg sections first, keep every lock above the splash line, and avoid burying narrow feet where waves can pump grit into their threads.
- Extend the thinnest sections first. If the tripod must stand in shallow surf, expose the lowest tubes while the upper joints remain high and dry.
- Set feet on firm surfaces. Choose flat rocks, compact wet sand, or purpose-made sand shoes instead of driving pointed feet deep into loose grains.
- Watch the waterline. A calm patch can receive a knee-high surge seconds later, especially when waves rebound from rocks or sea walls.
- Move before the legs sink. Water flowing around a foot removes sand and can bury the joint deeper with every wave.
- Carry the tripod open. After the shot, lift it clear without collapsing sandy sections into clean tubes.
Here is a common seascape scenario: you frame a two-second exposure while foam curls around a foreground rock. Rather than shortening the legs as the tide rises, you lift the entire open tripod and step back. It feels awkward for ten seconds, but it keeps wet grit outside the tubes and protects the locks.
A dedicated sand foot spreads the load like a snowshoe. It reduces sinking, though it cannot seal the leg against spray or windblown dust. A flat stone or sturdy board can serve the same purpose if it stays stable and does not introduce a wobble beneath your camera.
Do not hang a camera bag where breaking waves can soak it or swing it against the center column. If you add ballast, keep it low and steady, and never leave the setup unattended near moving water. Your tripod protects the composition; your footing and camera safety come before the photograph.
As an affiliate, we earn on qualifying purchases.
The Same-Day Rinse That Stops Salt Working Overnight
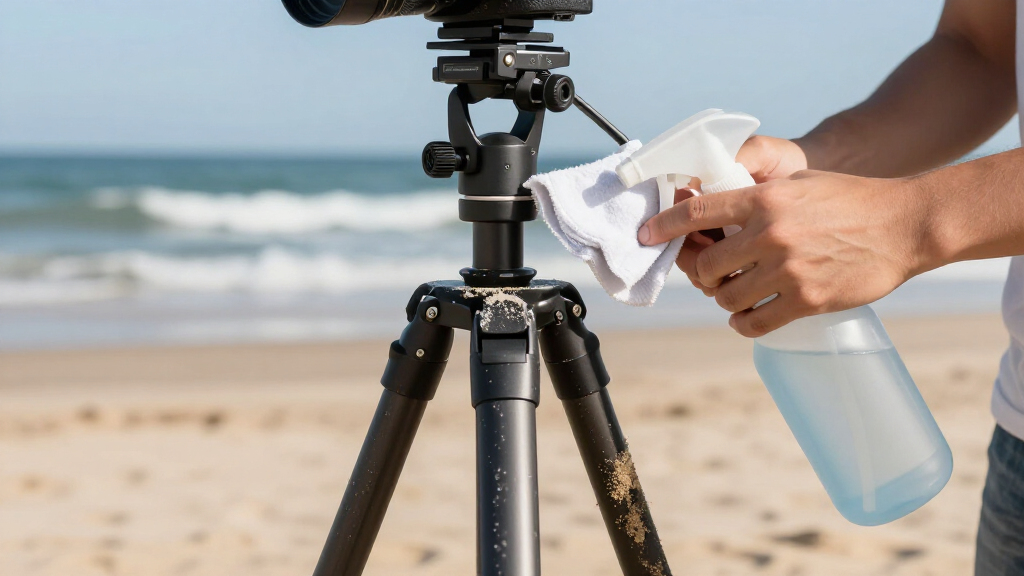
Caring for your tripod after salt spray requires a freshwater rinse that same day, even when the legs never stood in the ocean. Salt mist settles on screws, collars, hinges, and feet, absorbs moisture from the air, and can begin attacking exposed metal within hours [1].
- Keep sandy legs extended. Do not pull dirty lower sections through the locks before rinsing them.
- Use low-pressure fresh water. Let a gentle stream carry salt and loose grains downward; a hard jet can drive debris farther into a joint.
- Work from top to bottom. Rinse the apex, center column, leg tubes, collars, feet, and any spikes exposed during the shoot.
- Move clean locks gently. After visible grit has washed away, open and close each lock once to release trapped water and check its feel.
- Dry the legs fully extended. Place the tripod in moving air, away from direct heat, then collapse it only when joints and threads are dry.
I treat salt spray like invisible syrup. You may not see a coating after a misty sunrise, but later you can feel a faint tackiness on the leg collars and smell the sea on the straps. A five-minute rinse removes that film before it dries into white, abrasive crystals.
Pay close attention to the junction between the legs and the apex. Stainless screws seated in aluminum castings can develop galvanic corrosion when salty water bridges the two metals. According to widely published manufacturer maintenance guidance, freshwater cleaning and complete drying reduce this preventable damage [2].
Do not seal a wet tripod inside its padded case. The dark, still air holds moisture against screws, rubber grips, and fabric straps. Carry it home in an open boot tray, a loose towel, or a ventilated bag, then let it dry where air can move around every leg.
As an affiliate, we earn on qualifying purchases.
A Deep-Clean Routine That Restores Rough or Sticky Locks
Your tripod needs a full lock cleaning when rinsing no longer removes grinding, uneven resistance, or white salt deposits. Work on one leg joint at a time, follow the maker’s service guide, and arrange every collar, shim, washer, and bushing in removal order.
Before opening anything, photograph the assembled joint with your phone. Lay a pale towel across the table so black washers and tiny screws cannot roll into the carpet. If a manufacturer marks a bushing’s orientation, preserve it; installing a tapered or split shim backward can cause slipping or binding.
- Check the service instructions. Confirm that the lock is user-serviceable and note any warranty limits.
- Open one joint. Remove the collar or flip-lock parts slowly, without forcing corroded threads.
- Wash removable pieces. Use warm fresh water and a drop of mild dish soap, then loosen grit with a soft toothbrush.
- Wipe the tubes. Use a clean, lint-free cloth, changing the cloth when it picks up dark grit.
- Dry every part completely. Trapped water beneath a shim can restart corrosion after reassembly.
- Reassemble and test. Match the original order, tighten only as specified, and check that the leg holds firm without excessive force.
On a travel tripod that begins grinding after a beach session, you may find a thin crescent of sand beneath the split bushing. Removing that single gritty line can restore the collar’s soft, even turn. If the tube has deep grooves or the bushing looks chewed, cleaning cannot replace missing material; order the correct service part.
Avoid petroleum grease and penetrating sprays such as WD-40-style products inside twist locks. They leave a film that attracts dust, and some formulas can harm rubber or plastic. Many locks are designed to run clean and dry; where the manufacturer permits lubrication, use only a tiny amount of its specified product, often a suitable silicone grease [2].
As an affiliate, we earn on qualifying purchases.
Carbon, Aluminum, Twist, or Flip: What Changes at the Coast
Caring for your tripod depends more on its fittings and lock design than the label printed on its legs. Carbon fiber tubes resist metal corrosion, but salt can still attack their screws, castings, collars, feet, and bonded fittings; aluminum needs extra attention wherever scratches expose bare alloy.
| Tripod feature | Beach advantage | Beach weakness | Maintenance focus |
|---|---|---|---|
| Carbon fiber legs | Tubes do not rust or form aluminum oxide | Metal fittings and epoxy-bonded joints still face salt and grit | Rinse fittings, inspect bonded ends, and dry fully |
| Aluminum legs | Damage and scratches are usually easy to see | Exposed alloy can pit or develop white corrosion | Clean salt quickly and inspect worn anodizing |
| Twist locks | Often compact and relatively protected from direct grit | Sand can grind threads and internal bushings | Strip, wash, dry, and reassemble in the correct order |
| Flip locks | Fast to inspect and operate with gloves | Cams, pivots, and springs remain exposed | Brush around cams and check tension after cleaning |
Suppose you place one carbon tripod and one aluminum tripod beside the same tidal pool. The carbon tubes may emerge without a mark, while an exposed aluminum scratch develops a chalky white spot. Yet both can seize at the feet because salt entered the same metal threads.
Sealed or water-resistant locks reduce the amount of contamination that enters. They do not make a tripod waterproof, and repeated submersion can overwhelm seals as tubes move and internal air pressure changes. Treat sealing like a rain jacket, not a diving suit: useful protection, but still followed by cleaning.
Rubber grips and feet deserve attention as well. Salt dries rubber, ultraviolet light ages it, and trapped grains can wear the edges where grips meet collars. Rinse them, avoid prolonged storage in hot sunlight, and replace split or loose parts before they fall off on a dark shoreline.
What to Do When a Leg Is Already Grinding, Stuck, or Corroded
A grinding or stuck tripod leg needs less force and more cleaning. Stop turning the lock, keep the dirty section extended, rinse away loose material, and inspect the joint before applying leverage; forcing it can crush a bushing, strip threads, or drive grit across the tube.
If the lock still moves, use a gentle freshwater stream while holding the dirty end downward. Let the water carry particles out instead of farther inside. A soft brush can clear exposed threads, but avoid metal picks that scratch anodizing or carbon-fiber resin.
- Grinding without stiffness: Rinse first, then dismantle and clean if the sound remains.
- A collar that will not turn: Soak only the affected removable joint in warm fresh water, then follow the maker’s disassembly method.
- A leg that slips: Clean the bushing and tube before increasing lock tension; contamination often reduces grip.
- White, powdery spots: Remove dried salt with fresh water and a soft cloth, then inspect for pitting in the metal.
- Orange rust around screws: Stop using the support for valuable equipment until the fastener and surrounding casting are checked.
After full salt-water submersion, rinse immediately and plan a complete service rather than an exterior wipe. Water can hide inside feet, center-column sockets, foam grips, and hollow castings. Remove user-serviceable parts, dry them separately, and contact the manufacturer when sealed head mechanisms or bonded joints have flooded.
Imagine discovering a stiff leg while setting up beneath a pink dawn sky. The temptation is to twist harder because the light is fading. Resist it: switch to a lower stance, brace the camera safely, or shoot handheld, then repair the tripod away from blowing sand.
Retire a damaged support until it holds safely. A slipping leg beneath a camera is not a harmless annoyance; it is a mechanical warning.
Check the tripod again after 24 hours of drying. Locks should move evenly, feet should seat firmly, and every leg should carry downward pressure without creeping. Persistent binding, cracked carbon, deep pitting, or damaged threads calls for replacement parts or professional service.
Frequently Asked Questions
Can I put my tripod directly in the ocean?
You can place suitable tripod legs in shallow surf, but keep the locks above the waterline and expect to clean them afterward. Extend the lowest sections first, watch for waves that bury the feet, and give the tripod a same-day freshwater rinse.
Do I need to rinse a tripod that only received salt spray?
Yes. Fine salt mist coats screws, collars, hinges, and feet even when the legs stay dry to the eye, and salt attracts moisture from humid air. Rinse with low-pressure fresh water, then dry the tripod fully extended.
How often should I dismantle and clean the leg locks?
Clean the locks whenever you feel grinding, uneven resistance, or slipping, and inspect them after heavy sand or surf exposure. For regular coastal work, a scheduled cleaning every few outings can catch debris early, but your manufacturer’s service interval and actual shooting conditions should guide you.
Should I lubricate tripod twist locks?
Most twist locks work best clean and dry, unless their manufacturer calls for a specific lubricant. Avoid petroleum grease and penetrating sprays because sticky residue gathers grit; if lubrication is approved, apply only a very thin film of the named product.
Is a carbon fiber tripod better for beach photography?
Carbon fiber tubes resist corrosion better than exposed aluminum, but a carbon tripod still contains metal screws, castings, collars, and feet. It can save weight and avoid tube corrosion, yet it needs the same freshwater rinse and full drying routine after beach use.
Conclusion
The habit to remember is simple: do not collapse contamination into the tripod. Keep gritty sections extended, rinse salt away the same day, and let the entire support dry open. That short routine protects the sliding surfaces and tiny lock parts that carry the weight of your camera.
Your tripod rarely fails with drama at first. It whispers through a rough collar, a pale salt crust, or one leg that closes with a gritty rasp. Listen to that warning, clean the joint before your next shoot, and the legs will still open smoothly when a cold sunrise gives you thirty seconds of perfect light.
Fall yard work Picks
leaf blowers
As an affiliate, we earn on qualifying purchases.