TL;DR

Get audio and creator gear delivered free with Prime
- Fast, free delivery on millions of items
- Prime Video, Amazon Music and more included
- Member-only deals all year
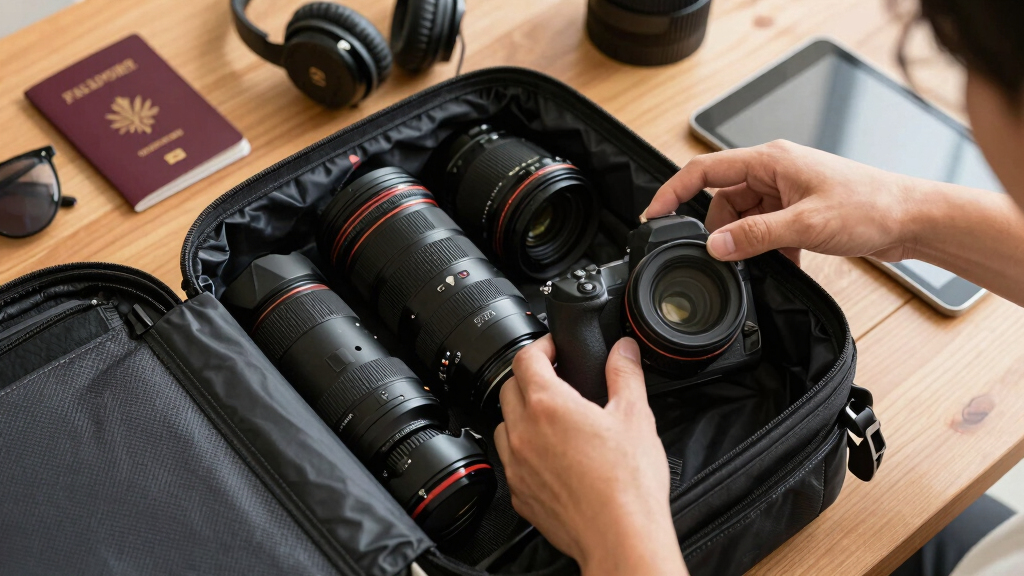
Flying with camera gear works best when your camera body, lenses, batteries, memory cards, and fragile accessories stay in your carry-on bag, not checked luggage. Most airlines allow one carry-on and one personal item, but size and weight rules vary, so check your airline before you pack. Keep lithium-ion batteries in your hand luggage, protect terminals, and build a compact kit you can lift, inspect, and shoot from without unpacking the whole bag.
The worst sound at an airport gate is not the boarding chime. It is the dull thud of a gate-checked bag hitting the cart when your favorite lens is inside, wrapped in hope and a sweatshirt.
Flying with camera gear is not hard, but it rewards planning. You need to know carry-on rules, battery limits, bag size, and how to pack so your kit survives cramped bins, long walks, and security trays slick with plastic dust.
I have flown with cameras for client jobs, family trips, and dawn shoots where one missed item would have wrecked the day. This guide gives you a practical packing strategy you can use before your next flight.
Keep camera bodies, lenses, spare batteries, memory cards, and hard-to-replace accessories in your carry-on or personal item.
Spare lithium-ion camera batteries belong in carry-on luggage, and batteries over 100Wh usually need airline approval.
Pack for inspection: visible batteries, grouped cables, upright lenses, and one empty pocket for airport items.
Choose your bag by aircraft, walking distance, and shoot type; backpacks suit most travel, while rollers help with heavy event kits.
Save receipts, serial numbers, insurance details, and a photo of your packed bag before international or paid-work travel.
Flying With Camera Gear: Carry-On Rules and Packing Strategy
TL;DR: Keep camera bodies, lenses, batteries, memory cards, and fragile accessories in your carry-on or personal item. Airline bag sizes vary, lithium-ion spares belong in hand luggage, and the best kit is compact enough to lift, inspect, and shoot from without unpacking the whole bag.
Your carry-on is not storage. It is your emergency shooting kit, battery-safe zone, and damage-control plan.
The carry-on hierarchy
Pack by replacement pain: fragile, valuable, battery-powered, and mission-critical items should ride in the cabin. Clothes can survive checked luggage. Your 70-200mm deserves better.
Bodies and lenses
Keep the camera body, workhorse zooms, fast primes, lens caps, and filters inside padded dividers. Stand lenses upright so shapes are easy to inspect.
Batteries and banks
Spare lithium-ion batteries and most power banks belong in hand luggage. Cover terminals with cases, sleeves, or original caps.
Cards and records
Memory cards, receipts, serial numbers, and insurance details weigh almost nothing and can save a trip if bags go missing.
Pack the bag like it will be inspected
A clean-opening camera bag moves faster through screening because each shape has a home: body, lens, power, cables, documents.
Use a bag that presents the full layout without digging.
Group batteries in one visible pouch with protected terminals.
Caps on both ends, dividers between each barrel.
Chargers and cables go in one pouch, not loose.
Reserve one pocket for passport, phone, watch, and boarding pass.
Where each item should ride
The practical packing answer is rarely “everything overhead.” Put the kit you cannot replace under the seat, then let less fragile extras fill the remaining space.
| Item | Best place | Carry-on fit | Checked-bag risk | Why it matters |
|---|---|---|---|---|
| Camera body with installed battery | Carry-on or personal item | ✓ Strong | ✗ High | Protects fragile electronics and keeps the camera available for inspection. |
| Spare lithium-ion batteries | Carry-on only | ✓ Required | ✗ Avoid | Spare lithium batteries belong in hand luggage because of fire risk. |
| Lenses and filters | Carry-on | ✓ Strong | ✗ High | Impact damage and rough handling can turn a checked lens into a repair bill. |
| Battery charger | Carry-on preferred | ~ Flexible | ~ Moderate | Keeping one charger with you helps during delays, layovers, or lost luggage. |
| Tripod or monopod | Depends on size and airline | ~ Check | ~ Moderate | Some fit overhead, while oversized or pointed legs may need checked packing. |
| Receipts, serials, insurance | Digital copy plus carry-on | ✓ Strong | ✗ Avoid | Documentation helps with customs questions, claims, and paid-work travel. |
Build the smallest useful kit
Choose gear by the images you need, not the images you might theoretically chase. A compact kit is easier to lift, guard, screen, and shoot from.
Battery watt-hour decision scale
Most mirrorless and DSLR batteries sit well below 100Wh. Larger cinema batteries, drone batteries, and high-capacity power stations need a closer label check before you leave for the airport.
Run this before the zipper closes
The small misses become big airport problems: one unlabeled battery, one loose charger brick, one missing card case, one bag that is heavier than the overhead bin rule.
Make the bag legible
Place the camera body near the top, batteries in one visible pouch, cables grouped, lenses upright, and an empty pocket ready for airport pocket clutter.
- Count batteries at home, then again at the hotel.
- Use light-colored pouches for card readers, keys, and tiny tools.
- Keep memory cards in a hard case, not loose in a pocket.
Plan for gate pressure
If the overhead bins fill, your under-seat personal item should still hold the irreplaceable kit: body, main lens, batteries, cards, documents, and one backup for critical work.
- Save receipts, serial numbers, and insurance details digitally.
- Photograph the packed bag before international or paid-work travel.
- Check airline size and weight limits before leaving home.
What You Can Usually Bring In Your Camera Carry-On
Flying With Camera Gear: Carry-On Rules and Packing Strategy starts with a simple rule: keep your fragile, valuable, and battery-powered items with you. Cameras, lenses, flashes, memory cards, filters, and most small accessories can usually go through airport security in a carry-on, as long as they meet airline size limits.
Most airlines allow one carry-on bag and one personal item, often with a carry-on size near 22 x 14 x 9 inches. That personal item can be a small camera bag, shoulder bag, or backpack that fits under the seat, but the exact rules change by airline and ticket type.
Here is the real-world version. If you are flying with camera equipment for a wedding weekend, put the camera body, two workhorse lenses, batteries, cards, and hard-to-replace pieces in the bag that stays under the seat. Clothes can survive the belly of the plane. Your 70-200mm lens deserves better.
Your carry-on is not storage. It is your emergency shooting kit, your battery-safe zone, and your damage-control plan.
According to TSA guidance, cameras and electronics are allowed through security screening, though officers may ask you to remove or inspect items separately [1]. I pack my bag so a security officer can see shapes quickly: body in one slot, lenses upright, batteries in a small case, cords in a pouch.
As an affiliate, we earn on qualifying purchases.
How To Pack Camera Gear So Security Goes Faster
Flying With Camera Gear: Carry-On Rules and Packing Strategy works best when your bag opens cleanly, like a tackle box. Security moves faster when cameras, lenses, and batteries are easy to see, easy to lift out, and not buried under chargers, snacks, and a rain jacket.
- Put batteries in one visible pouch so agents can inspect them without digging through your lenses.
- Keep camera bodies near the top, especially if your airport uses separate screening for electronics.
- Stand lenses vertically with caps on both ends and padded dividers between them.
- Place cables and chargers together in a small pouch so they do not snake around your bag.
- Leave one empty pocket for your phone, watch, passport, or boarding pass during screening.
On one early flight to Denver, I watched a photographer empty half a backpack into three bins because a charger brick had slipped under a lens hood. The line slowed, people sighed, and his rear lens cap rolled under the belt. A five-dollar pouch would have saved him five minutes and a lot of sweat.
I like a camera bag that opens flat because the interior reads clearly under bright airport lights. Black lens barrels disappear into black fabric, so I use light-colored pouches for tiny items like card readers, hex keys, and cable releases.
If you carry film, ask for a hand check when needed, especially with higher-speed film. Digital shooters have it easier, but memory cards still deserve a tiny hard case. They weigh almost nothing, and they hold the whole story.
lithium-ion camera battery travel case
As an affiliate, we earn on qualifying purchases.
As an affiliate, we earn on qualifying purchases.
The Battery Rules That Save You From Gate Trouble
Flying with camera batteries is mostly about lithium-ion safety: spare lithium-ion batteries belong in your carry-on, not checked luggage. Under FAA rules, many consumer lithium-ion batteries under 100Wh can travel in carry-on bags, while batteries over 100Wh usually need airline approval [2].
Most mirrorless and DSLR batteries sit far below 100Wh, so the usual concern is not capacity. It is short-circuit protection. Cover exposed contacts, use plastic battery cases, or keep each spare battery in its own sleeve so metal keys or coins cannot bridge the terminals.
Here is the table I wish every new traveling photographer had before packing at midnight.
| Item | Best Place To Pack It | Why It Matters |
|---|---|---|
| Camera body with installed battery | Carry-on | Protects fragile gear and keeps it available for inspection. |
| Spare lithium-ion batteries | Carry-on only | FAA and TSA guidance puts spare lithium batteries in hand luggage because of fire risk [1][2]. |
| Battery charger | Carry-on or checked | Carry-on is safer if you need to charge during a delay. |
| Power bank | Carry-on | Most power banks use lithium-ion cells and follow battery limits. |
| AA batteries for flashes | Carry-on preferred | Small cases prevent loose batteries from rattling against metal. |
My simple field habit: I count batteries before leaving home, then again at the hotel. For a day of travel and one evening shoot, I usually want three camera batteries, one charger, and a small USB power option. More than that adds weight fast.
If you use large cinema batteries, drone batteries, or high-capacity power stations, check the watt-hour label before you leave. If the label is scratched off, the airport conversation gets much harder. Clear labels beat confident explanations every time.
As an affiliate, we earn on qualifying purchases.
A Packing Strategy That Keeps Your Kit Small And Useful
Flying With Camera Gear: Carry-On Rules and Packing Strategy comes down to choosing the gear you will actually use. A carry-on camera kit should be suitable for a real shoot, small enough to lift overhead, and organized enough that one missing pouch does not ruin the trip.
I build travel kits around assignments, not fantasies. For a city weekend, I might pack one camera body, a 24-70mm, a fast 35mm, three batteries, cards, a cloth, and a compact strap. For a paid portrait job, I add a second body and one small flash because failure has a cost.
- Start with the image you need: landscape, portrait, street, wildlife, wedding, or family travel.
- Pack one backup for mission-critical gear: a second body, spare card, or extra battery.
- Leave duplicate comfort items behind: four similar primes feel good at home and heavy by gate B27.
- Put heavy lenses low and close to your back: the bag carries better and feels less like a brick.
- Use pouches by function: power, cleaning, cards, audio, and small tools.
Think of your camera bag like a restaurant prep station. The chef does not stack onions under pans under towels. Everything has a place because speed and calm matter when the room gets loud.
A good packing strategy also leaves room for the human part of travel. Add a snack, medication, glasses, and a thin layer if the flight runs cold. The best camera bag is useless if you arrive tired, thirsty, and too annoyed to make pictures.
As an affiliate, we earn on qualifying purchases.
When To Use A Backpack, Shoulder Bag, Or Roller
The best camera travel bag is the one that protects your gear while fitting your airline, your body, and your shooting plan. Backpacks carry weight well, shoulder bags give fast access, and rollers save your back but can be the first target when gate agents run out of overhead space.
| Bag Type | Best For | Watch Out For |
|---|---|---|
| Camera backpack | Long walks, mixed lenses, under-seat packing | Slow access if you need to swap gear quickly. |
| Shoulder bag | One body, two lenses, street shooting after landing | Uneven weight can punish your neck on long travel days. |
| Camera roller | Heavy kits, events, airport-heavy trips | May be gate-checked if bins fill or aircraft are small. |
| Regular backpack with insert | Light kits and personal travel | Less structure than a dedicated camera bag. |
I use a backpack when I need to move through a city after landing. Cobblestones, subway stairs, and rain-slick sidewalks make rollers feel clumsy. For conference or studio jobs with more lights and stands, a roller can be kinder to your spine.
Before you choose, check two numbers: the airline’s bag size and your packed weight. Some international carriers enforce carry-on weight more strictly than many U.S. airlines. A bag that fits the metal sizer can still fail at the scale.
If you fly small regional aircraft, assume overhead bins will be tight. I keep the irreplaceable core in a bag that fits under the seat: body, lenses, batteries, cards. Anything else is a luxury.
How To Protect Lenses From Drops, Pressure, And Bad Weather
Protect lenses by controlling movement, pressure, and moisture inside your bag. Use padded dividers, cap both ends, keep glass from touching hard accessories, and add a simple rain cover or dry bag when storms, snow, or boat spray could turn a travel day messy.
Lenses are tougher than beginners fear and more fragile than overconfident shooters admit. I have seen a lens survive a hard knock in a padded bag, and I have seen a filter ring bend from one careless drop onto tile. The difference often comes down to whether the lens had room to accelerate.
- Do not leave empty gaps around heavy lenses; fill space with a wrap, shirt, or divider.
- Keep filters in rigid cases, not loose sleeves that flex under pressure.
- Pack cleaning fluid carefully and follow airline liquid rules for carry-on toiletries.
- Add a microfiber cloth in two places: one in the camera bag and one in your jacket.
- Use silica gel packs after humid locations, but dry them properly between trips.
On a wet coastal shoot, salt mist can dry into a fine white crust on a lens barrel. It feels gritty under your fingers, like sugar on a countertop. A blower, cloth, and patience are better than rubbing that grit across front glass.
Tripods need a separate decision. Many airlines allow compact tripods in carry-on bags, but long legs, spiked feet, or bulky heads can attract attention at security or fail the size check. When the tripod is replaceable and the lens is not, I know which one gets the padded seat.
The Documents That Help If Your Gear Gets Questioned
Good documentation helps you prove ownership, speed up insurance claims, and avoid awkward customs questions when your kit looks professional. Keep serial numbers, receipts, insurance details, and quick phone photos of your packed bag in a cloud folder you can reach without digging.
This matters most when you travel internationally with multiple bodies, several lenses, or commercial-looking gear. Customs officers may ask whether you bought equipment abroad, especially when the kit is shiny, boxed, or still wearing store labels. Receipts and serial numbers make the answer simple.
- Photograph each serial number before your trip.
- Save receipts as PDFs in a folder available offline.
- Take one photo of the packed bag before you leave home.
- Carry insurance details if your gear value is high.
- Use a plain inventory list with item, serial number, and replacement value.
I once had a customs officer ask about two camera bodies after a job abroad. The conversation stayed friendly because I had serial numbers and purchase records on my phone. No drama. Just a few taps and a polite nod.
Insurance is not exciting, but neither is paying for a cracked lens out of pocket. If you shoot paid work, ask whether your policy covers theft from vehicles, international travel, and checked baggage. The boring line in the policy is the one you will care about later.
A Pre-Flight Checklist You Can Run In Ten Minutes
A pre-flight camera checklist prevents the small misses that become big problems at the airport. Ten minutes before you zip the bag, confirm airline size rules, battery placement, memory cards, chargers, documents, weather protection, and the one lens you would regret leaving behind.
- Check your airline’s carry-on and personal-item limits, including weight if you are flying internationally.
- Move spare lithium-ion batteries to carry-on and cover the contacts.
- Format cards only after backups exist; never wipe a card just because the flight is soon.
- Charge batteries and pack the charger with the correct plug adapter.
- Clean lenses and sensors before travel so you are not doing it in a hotel bathroom.
- Save serial numbers and receipts in an offline folder.
- Test the packed weight by walking around the block with the bag.
The walk test sounds silly until you try it. A bag that feels fine in your bedroom can feel like wet cement after security, coffee, a gate change, and a half-mile terminal hike. Your shoulders tell the truth quickly.
This checklist also helps beginners resist panic packing. You do not need every lens you own. You need a kit that can make the pictures you planned, survive the flight, and stay organized when your boarding group gets called early.
For readers looking for a comprehensive but practical routine, this is the whole rhythm: check the rules, trim the kit, protect the batteries, document the gear, and pack for inspection. That covers the important aspects without turning your bag into a rolling closet.
Example Carry-On Setups For Common Trips
Examples make the packing choices easier because camera travel is rarely abstract at the gate. A parent flying to a family reunion does not need the same bag as a photographer covering a three-day conference, and neither person packs like a wildlife shooter headed for a small regional plane.
| Trip Type | Practical Carry-On Kit | What To Leave Behind |
|---|---|---|
| Family vacation | One camera body, one standard zoom, one fast prime, two or three batteries, cards, charger, cloth, and strap. | Extra specialty lenses you might use once but will carry all week. |
| Wedding or paid portrait job | Two bodies, two essential lenses, flashes or trigger, cards, batteries, charger, and documents in the under-seat bag. | Replaceable stands, bulky modifiers, or clothes that can go in checked luggage. |
| Wildlife or sports trip | Camera body, long lens, teleconverter if needed, batteries, cards, rain cover, and lens support packed with tight padding. | Duplicate short lenses that do not serve the main subject. |
| City weekend | Small body, 24-70mm or similar zoom, fast 35mm or 50mm, batteries, cards, and a compact cleaning kit. | Heavy roller bags that turn stairs, trains, and cobblestones into a chore. |
For example, if I were flying to photograph a friend’s small courthouse wedding, my under-seat bag would hold two camera bodies, a 24-70mm, an 85mm, three batteries, four cards, a small flash, and receipts saved on my phone. My checked bag could take shoes, a jacket, and the backup shirt. The ceremony cannot wait for a delayed suitcase.
For a casual city trip, I would make the opposite choice: one body, one zoom, one prime, and enough open space for water, glasses, and a thin layer. That setup is less dramatic on the dining room table, but it is exactly what you want after six miles of walking and one crowded train ride.
Frequently Asked Questions
Can I bring professional camera gear as a carry-on?
Yes. Cameras, lenses, flashes, and accessories can usually travel in carry-on luggage if your bag meets airline size and weight limits. Most airlines allow one carry-on and one personal item, but always check your specific ticket because basic economy and regional flights can have tighter rules.
Do camera batteries have to go in carry-on luggage?
Spare lithium-ion camera batteries should go in carry-on luggage, not checked bags. According to FAA and TSA guidance, spare lithium batteries need protection from short circuits, and batteries over 100Wh usually need airline approval [1][2].
Are tripods allowed on planes?
Many compact tripods are allowed in carry-on bags, but airline size rules and security judgment matter. Long tripods, spiked feet, and heavy metal legs may create problems, so pack a travel tripod inside your bag or check a larger support if it is not essential.
Should I check my camera bag if the gate agent asks?
If you can avoid it, do not check your main camera bag. Remove the camera body, lenses, batteries, cards, and other fragile items before any gate check. Keep a small under-seat pouch ready for the gear you cannot risk losing or breaking.
How many lenses should I pack for air travel?
Pack the fewest lenses that cover the pictures you truly plan to make. For many trips, one standard zoom and one fast prime will do more good than a heavy bag of near-duplicates. Paid jobs deserve more backup gear, but casual travel rewards a lighter shoulder.
Conclusion
The best rule for flying with camera gear is simple: carry the gear you cannot replace quickly, and pack it so another person can inspect it without taking your bag apart. That means batteries in hand luggage, lenses padded, documents ready, and a kit small enough that you can lift it with one calm motion.
Travel days are noisy, rushed, and full of hard plastic edges. Pack well, and your camera comes out ready for the quiet part: the first frame after landing, when the light hits a new street and the trip finally begins.
Columbus Day / Indigenous Peoples' Day Picks
long weekend sales
As an affiliate, we earn on qualifying purchases.