TL;DR
Camera backpack fit beats brand and padding every time: measure your torso (C7 vertebra to iliac crest), choose a size by that number rather than your height, and let a padded hip belt carry 80–90% of the load. Adjust straps in order — hip belt, shoulder straps, load lifters at roughly 45°, sternum strap last — and pack heavy gear against your spine at mid-height. Keep total carry under 20–25% of your body weight for all-day comfort.
The most expensive camera bag I ever bought gave me the worst back pain of my career. The cheapest one — a scuffed midrange pack — never hurt at all. The difference had nothing to do with padding or price. It came down to fit: one bag matched my torso, and the other didn’t.
Here’s the part most photographers miss. You probably bought your bag based on your height, or on how much gear it swallows. But bags are built around torso length, and two people who both stand 5’10” can differ by two to three inches of torso. Buy the wrong length, and no amount of strap fiddling will save you.
In this guide, I’ll walk you through the same process I run before any long shooting day: how to measure your torso in two minutes, how to dial in each strap in the right order, where heavy gear should sit inside the bag, and what to do when no standard camera bag fits your frame. Your shoulders will thank you by hour six.
Measure your torso (C7 vertebra to iliac crest), not your height — it takes under two minutes, and two people the same height can differ by 2–3 inches of torso.
A padded hip belt sitting on your iliac crest carries 80–90% of the load; shoulder straps should carry only 10–20%.
Always adjust in order: hip belt → shoulder straps → load lifters at roughly 45° → sternum strap, and re-run the sequence whenever the load changes.
Keep total carry under 20–25% of your body weight, and pack the heaviest gear against your spine at mid-height — it can make the same bag feel pounds lighter.
If you fall outside average torso ranges, an adjustable-harness camera bag or a hiking pack with a camera insert will beat any fixed-size bag.
Camera Backpack Fit: Torso Length, Straps & Comfort
Fit beats brand and padding every time. Measure your torso — C7 vertebra to iliac crest — choose a size by that number, and let a padded hip belt carry the load. Your shoulders will thank you by hour six.
Why Your Shoulders Hurt: It’s Fit, Not the Bag
Camera gear is unusually dense — a body and two lenses can weigh as much as a weekend of backpacking food crammed into half the space. That concentrated load punishes every small fitting mistake, starting within the first hour.
The ache has a mechanism
An ill-fitting bag recruits your neck muscles to stabilize weight your hips should be carrying. On a ten-hour wedding day, the ache gets loud by the reception — and nine times out of ten, the bag was fine. The harness had never been adjusted.
Price is not protection
The most expensive bag can deliver the worst back pain of your career while a scuffed midrange pack never hurts at all. The difference: one matched the torso, the other didn’t. No amount of strap fiddling rescues the wrong length.
Measure Your Torso in Two Minutes
Torso length — not your height — determines what size bag you need. Grab a flexible tape measure and a friend. The whole thing takes less time than formatting a memory card.
Find your C7 vertebra
Tilt your head forward and feel the base of your neck. The bump that sticks out farthest is C7 — your starting point.
Find your iliac crest
Hands on hips, thumbs pointing toward your spine. The line between your thumbs sits at iliac crest level — that’s your target.
Measure along the spine
Run the tape from C7 down to that line, following the curve of your back. Write it down in inches and centimeters.
The Four-Step Strap Sequence
Order matters because each strap assumes the one before it is already set. Skip the sequence and you’ll chase discomfort all day. Re-run it every time the load changes — thirty seconds of adjustment beats three hours of compensating.
Hip Belt
Carries 80–90%Center the padded belt on top of your iliac crest — not your waist, not your stomach — and cinch it snug.
Shoulder Straps
Carries 10–20%Snug until they wrap the shoulder with no gap at the top, then stop. Overtightening is the most common self-inflicted mistake.
Load Lifters
Set at ~45°They pull the load’s center of gravity toward your back. Slack lifters are the usual culprit behind “my bag pulls me backward.”
Sternum Strap
Carries nothingClip it about an inch below your collarbone and snug it lightly. If it restricts your breathing, you’ve gone too tight.
If your shoulders carry the load, your hips are just along for the ride — and your trapezius muscles will file a formal complaint by mid-afternoon.
Field note · the most common fitting mistake, observed on locationWhat Each Strap Actually Does — and the Symptom When It’s Wrong
Every strap has one specific job. Most comfort problems trace back to a strap doing a job it was never built for.
| Component | Its Real Job | Set It Right | Symptom When It’s Wrong |
|---|---|---|---|
| Hip BeltThe load bearer | Carry 80–90% of total load | On top of the iliac crest, firmly snug | Shoulder & neck pain within an hour |
| Shoulder StrapsThe stabilizers | Stabilize; carry only 10–20% | No gap over the shoulder, snug not tight | Aching traps, numb arms |
| Load LiftersThe angle keepers | Pull center of gravity toward your back | Roughly a 45° angle to the pack top | Bag drags you backward, top-heavy feel |
| Sternum StrapThe positioner | Stop shoulder straps sliding outward | One inch below collarbone, lightly snug | Restricted breathing, chafing |
Packing matters as much as straps: heaviest gear — bodies, fast telephotos — goes against your spine at mid-height; light items against the outer shell. It keeps the center of gravity near your body’s natural center and can make the same bag feel pounds lighter.
From Tape Measure to Hour Six
C7 to iliac crest — under two minutes, in inches and cm.
Match the torso number to the chart — never your height.
Belt → shoulders → lifters → sternum. In that order.
Heavy gear against the spine, mid-height, under 20–25% body weight.
Pain-free at hour six — hips carrying, shoulders relaxed.
Why Your Shoulders Hurt: It’s a Fit Problem, Not a Bag Problem
Camera backpack fit matters more than brand, padding, or price because camera gear is unusually dense — a body and two lenses can weigh as much as a full weekend of backpacking food crammed into half the space. That concentrated load punishes every small fitting mistake, and it starts punishing within the first hour.
Put numbers to it. A typical working kit — two bodies, three to four lenses, and a laptop — runs 15 to 25 lb (7 to 11 kg). Add a tripod, water, and a jacket, and plenty of wedding and landscape photographers haul 30 lb or more [1]. The widely used guideline from load-carriage research says to keep all-day carry under 20–25% of your body weight [2]. For a 150 lb photographer, that’s a ceiling of roughly 30 to 37 lb — a line many of us blow past before lunch.
Here’s why fit matters so much under that kind of load. On a ten-hour wedding day, an ill-fitting bag doesn’t just feel heavy. It recruits your neck muscles to stabilize weight your hips should be carrying, and the ache gets loud by the reception. I’ve watched shooters knead their traps between the ceremony and the speeches, convinced their bag was junk. Nine times out of ten, the bag was fine. The harness had never been adjusted, or the torso length was wrong from day one.
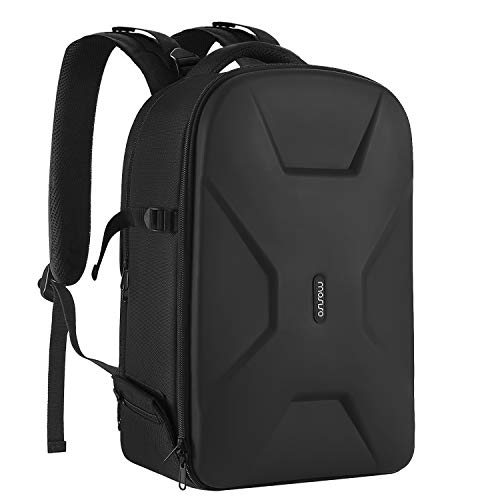
MOSISO Camera Backpack, DSLR/SLR/Mirrorless Photography Camera Bag
- Product Dimensions: 17.32 x 11.8 x 7.5 inches
- Removable Modular Inserts: Customizable padded dividers
- Laptop Storage: Fits up to 16-inch laptops
As an affiliate, we earn on qualifying purchases.
As an affiliate, we earn on qualifying purchases.
How to Measure Your Torso Length in Two Minutes
Torso length is the distance from your C7 vertebra — the bony bump at the base of your neck when you tilt your head forward — down to your iliac crest, the top shelf of your hip bones. This number, not your height, determines what camera backpack fit you need.
Grab a flexible tape measure and a friend. The whole thing takes less time than formatting a memory card.
- Find your C7 vertebra. Tilt your head forward and feel the base of your neck. The bump that sticks out farthest is C7.
- Find your iliac crest. Put your hands on your hips with your thumbs pointing toward your spine. The line between your thumbs sits at iliac crest level — that spot on your lower back is your target.
- Measure the distance. Have your friend run the tape from C7 down along your spine to that line, keeping the tape against your back so it follows the curve.
- Write the number down in inches and centimeters. You’ll compare it against size charts every time you shop for a bag.
Here’s what the typical ranges look like [3]:
| Size | Torso length (in) | Torso length (cm) |
|---|---|---|
| Extra-small | 14–15.5 | 36–39 |
| Small | 16–17.5 | 41–44 |
| Medium / Regular | 18–19.5 | 46–50 |
| Large / Tall | 20+ | 51+ |
I’ve measured shooting partners who matched my height to the centimeter and still landed a full size apart from me. One fits a medium, the other a large. Height told us nothing; the tape told us everything.

waka Camera Neck Strap with Quick Release, Safety Tether and Underarm Strap
- Secure Underarm Stabilizing Strap: Keeps camera stable during use
- Locking Sling Straps: Prevent camera sway with dual lockers
- Quick Release with Anti-Slip Padding: Securely fasten camera to strap
As an affiliate, we earn on qualifying purchases.
As an affiliate, we earn on qualifying purchases.
The Four-Step Strap Sequence I Run Before Every Shoot
Adjust your camera backpack fit in this order: hip belt first, then shoulder straps, then load lifters, then the sternum strap last. Sequence matters because each strap assumes the one before it is already set — skip the order and you’ll chase discomfort all day.
- Hip belt. Center the padded belt on top of your iliac crest — not your waist, not your stomach — and cinch it snug. A correctly positioned hip belt transfers 80–90% of the load to your hips and legs, the strongest load-bearing structure in your body [1]. Think of your hips as the load-bearing wall of a house: everything else just frames around them.
- Shoulder straps. Snug them until they wrap the shoulder with no gap at the top, then stop. They should carry only 10–20% of the weight once the belt is engaged. If they’re carrying more, the belt isn’t tight enough.
- Load lifters. These small straps run from the top of the shoulder straps to the top of the bag. The core angle for load lifters is about 45 degrees — they pull the load’s center of gravity toward your back and stop the bag from dragging you backward. Slack lifters are the usual culprit behind ‘my bag pulls me backward.’
- Sternum strap. Clip it about an inch below your collarbone and snug it lightly. It stabilizes the shoulder straps; it carries nothing. If it restricts your breathing, you’ve gone too tight.
The most common self-inflicted fitting mistake I see in the field is overtightened shoulder straps. If your shoulders carry the load, your hips are just along for the ride — and your trapezius muscles will file a formal complaint by mid-afternoon.
Re-run this sequence every time the load changes. Swap a 70-200mm for a small prime and the balance shifts; thirty seconds of re-adjustment beats three hours of compensating.
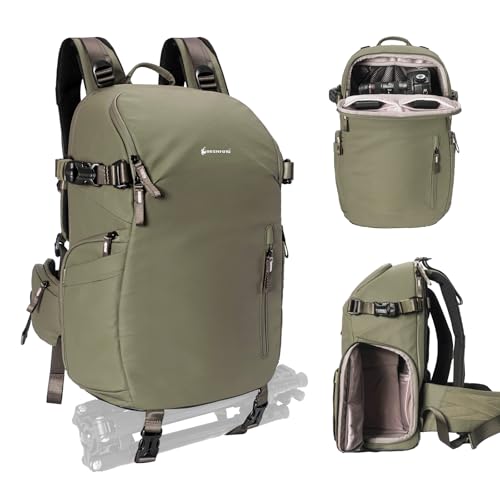
Besnfoto Camera Backpack Waterproof Bag Professional Travel Photography Bag Large for DSLR SLR Mirrorless Camera with Tripod Holder and Laptop Compartment Compatible with Canon/Nikon/Sony
- Variable Internal Structure: Removable dividers for customizable storage
- Large Capacity: 25L with multiple compartments for gear
- Premium Waterproof Material: Water-resistant, tear-resistant Damali fabric
As an affiliate, we earn on qualifying purchases.
As an affiliate, we earn on qualifying purchases.
What Each Strap Actually Does — and the Symptoms When It’s Wrong
Every strap on your bag has one specific job, and most comfort problems trace back to a strap doing a job it was never built for. This table maps each component to its role, its correct setting, and the symptom that tells you it’s off.
| Component | Its real job | Set it right | Symptom when it’s wrong |
|---|---|---|---|
| Shoulder straps | Stabilize; carry 10–20% of load | No gap over the shoulder, snug not tight | Aching traps, numb arms |
| Hip belt | Carry 80–90% of load | On top of the iliac crest, firmly snug | Shoulder and neck pain within an hour |
| Sternum strap | Keep shoulder straps from sliding outward | One inch below collarbone, light tension | Straps slipping off shoulders |
| Load lifters | Pull the load toward your back | Roughly 45° angle | Bag dragging you backward, top-heavy feel |
| Lumbar pad / back panel | Fill the lower-back curve, hold belt position | Sits in your lumbar curve without gaps | Belt creeping down as you walk |
A few details worth knowing. Good shoulder straps run 2.5 to 3 inches wide, use an S-curve shape, and pack dense foam that doesn’t bottom out under a heavy zoom. Spacing matters too: straps set too far apart slide off narrow shoulders, and straps set too close chafe your neck like a stiff collar. And that thin webbing strap on a small bag? It’s a stabilizer, not a load-bearing belt. A genuine hip belt is padded and contoured — you’ll feel the difference the first time you cinch one over 20 lb of gear.

Besnfoto Waterproof Camera Backpack, Rolltop Photography Bag for Photographers, Expandable DSLR Mirrorless Case with 15.6" Laptop Compartment, Quick Side Access & Tripod Holder for Hiking Travel
- Waterproof Material and Zippers: High-density tarpaulin with water-resistant zippers
- Includes Rain Cover: Bonus rain cover for extreme weather protection
- Expandable Rolltop Design: Adds 5-7L extra capacity for personal items
As an affiliate, we earn on qualifying purchases.
As an affiliate, we earn on qualifying purchases.
Pack Heavy Gear Against Your Spine, Not Against the Zipper
Put your heaviest gear — camera bodies and fast telephotos — closest to your spine and at mid-height in the bag, with light items against the outer shell. This keeps the load’s center of gravity near your body’s own center, so the bag rides with you instead of pulling against you.
Physics explains why. Weight hanging away from your back acts like a lever, multiplying the pull on your shoulders. A 5 lb lens parked against the outer shell can feel like twice that by sunset; the same lens tucked against the spine nearly disappears. I learned this the hard way on a coastal hike in Big Sur, when I packed my 100-400mm in the outer compartment for ‘quick access.’ By mile three, my lower back was bargaining with me. I repacked at the trailhead the next morning — heavy lens inward, filters and rain shell outward — and the identical bag felt five pounds lighter.
A few more packing rules that pay off:
- Tripods: mount them on the side with two anchor points. A rear-mounted tripod swings like a pendulum and yanks the bag sideways with every stride.
- Weight ceiling: keep total carry under 20–25% of your body weight for all-day comfort [2]. Weigh your packed bag once on a bathroom scale — the number surprises almost everyone.
- Back panels: suspended mesh panels breathe beautifully on hot days, but they push the load slightly farther from your back. Channeled foam sits closer; mesh runs cooler. Pick per climate.
- Partial loads: a stiffened back panel or internal frame keeps a half-full bag from collapsing and barreling into your spine.
When No Standard Camera Bag Fits You, Try These Three Fixes
If you’ve measured your torso and nothing in the camera aisle matches it, you have three good options: buy a bag with an adjustable harness, look at women’s-specific or petite fits, or drop a camera insert into a well-fitted hiking pack. One of these will work.
First, adjustable torso systems. Hiking-pack-style harnesses that slide through three to four inches of torso range have finally migrated into premium camera backpacks — Shimoda’s height-adjustable harness, offered in multiple torso sizes, is the best-known example, and similar systems keep appearing across the category. It’s the single biggest fit improvement this segment has seen in years.
Second, women’s-specific designs are genuinely different — not marketing paint. They pair narrower shoulder-strap spacing with shorter torso options and S-curve straps shaped around the chest rather than a flat unisex yoke. Adjustable-height sternum rails matter here too. If you’re petite or narrow-shouldered, these details fix problems no amount of strap tightening will.
Third — my sleeper recommendation — buy a hiking backpack that fits your torso perfectly and drop in a padded camera insert (ICU). Hiking brands have offered real torso sizing for decades, which is exactly why this combo so often beats dedicated camera bags for anyone outside the average range. You give up quick side access; you gain a harness engineered around bodies, not around carry-on limits.
Speaking of which: the 22 × 14 × 9 in (56 × 36 × 23 cm) carry-on box forces camera bags to run short and deep, which is one reason torso fit suffers in this category. Removable hip belts and stowable harnesses help on travel days — and a rear-access panel keeps gear secure in crowds, though you’ll take the bag fully off every time you want a lens. Tradeoffs, always.
Frequently Asked Questions
How do I measure my torso length at home?
Tilt your head forward and find the bony C7 bump at the base of your neck. Then put your hands on your hips with thumbs pointing backward — the line between your thumbs marks iliac crest level. Have a friend run a flexible tape from C7 down along your spine to that line. It takes under two minutes, and it’s the most-skipped step in buying a bag.
Should my camera bag have a hip belt, and does it really make a difference?
If your kit weighs more than about 10–12 lb, yes. A padded, contoured hip belt sitting on your iliac crest moves 80–90% of the weight to your hips and legs — the strongest load-bearing structure you have. Thin webbing belts are stabilizers only. Once you’ve carried 20 lb with a real belt, you won’t go back.
Why do my shoulders hurt after an hour of shooting, and how do I fix it?
Three usual culprits: the hip belt is unclipped or sitting on your waist instead of your iliac crest, the shoulder straps are overtightened, or the load lifters are slack and letting the bag sag backward. Re-run the four-step sequence — belt, straps, lifters, sternum — and most shoulder pain resolves once the belt actually takes the load.
Can I use a regular hiking backpack for camera gear?
Yes, and it’s often the best-fitting option available. Drop a padded camera insert (ICU) into a hiking pack sized to your torso — hiking brands have offered real torso sizing for decades, which is exactly what most camera bags lack. You give up quick side access and gain a harness genuinely engineered around the human body.
Are women’s-specific camera bags actually different, or just marketing?
Actually different. They combine narrower shoulder-strap spacing, shorter torso options, and S-curve straps shaped around the chest instead of a flat unisex yoke, usually with adjustable-height sternum rails. For narrow shoulders and shorter torsos, these are functional fixes — not cosmetic ones.
My bag feels top-heavy and pulls away from my back — what’s wrong?
Check three things in order. First, tighten the load lifters to roughly 45° — slack lifters are the most common cause. Second, move heavy gear against your spine at mid-height; weight near the outer shell acts like a lever. Third, if neither helps, suspect a torso mismatch — the bag’s frame may simply be the wrong length for you.
Conclusion
Before you spend another dollar on a bag, spend two minutes with a tape measure. Find your C7, find your iliac crest, write the number down, and shop by torso length instead of height. Then set the harness in order — hip belt, shoulder straps, load lifters, sternum — and let your hips carry the 80–90% they were built for.
Your shoulders were never meant to be shelves. Hand the load to the load-bearing wall, and that sunset shoot four miles from the trailhead stops being a negotiation with your own back. The best camera bag isn’t the most padded or the most expensive. It’s the one that disappears the moment you start walking.