
TL;DR
Open a free Amazon Business account
Business pricing, bulk buying and tax-exempt orders.
Create a free accountAs an affiliate, we earn on qualifying purchases.
TTL and manual flash are not competing levels of expertise; they are two exposure-control methods suited to different shooting conditions. Use TTL when subject distance or bounce conditions keep changing, and choose manual flash when the light, subject, and camera stay fixed and every frame needs to match.
A bride steps from a low, amber-lit hallway into a white reception room, and your flash suddenly has a completely different job. You have perhaps two seconds to react, the ceiling height has changed, and the moment will not wait for a test frame. This is where your choice between TTL and manual flash becomes practical rather than theoretical.
I use both methods because each solves a different problem. TTL follows change by measuring reflected preflash light and calculating output for each photograph, while manual flash holds its output steady until you change it. One helps when people and shooting positions move; the other gives you repeatable light when the set stays still.
You will learn when to use each mode, why distance matters so much, and how aperture, ISO, shutter speed, bounce surfaces, and high-speed sync affect the result. You will also get a field-ready workflow for moving from TTL speed to manual consistency without losing the mood of the scene. The aim is simple: fewer frames with pale faces, black backgrounds, or irritating exposure jumps—and more photographs where the light feels deliberate.
Choose TTL for moving subjects, changing rooms, variable bounce paths, and one-chance candid moments.
Choose manual flash when the camera, subject, and lights stay fixed or when a sequence must have matching exposure.
Use TTL compensation to correct automatic output; changing from 1/8 to 1/4 manual power adds one stop.
Doubling flash-to-subject distance costs roughly two stops, so distance discipline matters in manual setups.
Treat HSS as a separate operating mode that allows fast shutter speeds but reduces flash range and increases battery demand.
TTL vs Manual Flash: When to Use Each
They are not competing levels of expertise. TTL follows changing conditions; manual flash holds output steady. The best choice depends on whether your subject, light and shooting position are moving—or staying put.
The scene changes
Moving people, changing rooms, variable bounce paths and one-chance candid moments.
The set stays fixed
Marked positions, repeatable light ratios and sequences where every frame must match.
of the previous illumination
from the inverse-square effect
in manual flash output
then adjust compensation to taste
Adaptability or repeatability?
TTL attempts to maintain exposure as conditions change. Manual flash maintains output even when conditions change. Neither mode judges whether the light is flattering, natural or appropriate for the mood.
Follow the action
A low-power preflash is measured through the lens immediately before the exposure. The camera then calculates the main burst for that frame.
- Responds to changing distance and composition
- Handles variable ceilings and bounce surfaces
- Improves first-frame success in fast situations
- Adjusts through flash exposure compensation
Lock the result
You select full, 1/2, 1/4, 1/8 or lower power. That output remains fixed until you change power, zoom, modifier or distance.
- Delivers consistent frame-to-frame exposure
- Preserves precise multi-light ratios
- Ignores changes in clothing and product tone
- Makes proven setups easy to reproduce
Start with the mode that fits the scene
Begin with the better operational fit, then refine. A mixed event can use both: TTL for roaming coverage and manual flash for a fixed portrait corner.
| Situation | Starting choice | Why it works |
|---|---|---|
| Moving child or dancing guest | TTL ✓ | Output adjusts as subject distance changes. |
| Wedding reception across several rooms | TTL ✓ | Bounce distance, ceiling height and surface colour keep changing. |
| Studio portrait with marked positions | Manual ✓ | Fixed output keeps every expression consistently exposed. |
| Product catalog on a tabletop | Manual ✓ | White, black and reflective products receive matching light. |
| One-chance candid moment | TTL ✓ | Fast metering improves the chance of a usable first exposure. |
| Dramatic three-light portrait | Manual ✓ | Fixed power makes key, fill and rim ratios repeatable. |
| Event coverage plus portrait corner | Hybrid ~ | TTL handles roaming; manual controls the stationary set. |
Twice as far means roughly one-quarter the light
Distance is the hidden reason TTL feels effortless in motion—and why manual flash rewards marked positions. When distance doubles, illumination falls by about two stops.
A manual exposure that works at 2 metres will be substantially darker at 4 metres unless power, aperture or ISO changes. Move from 2 metres to 1 metre and the subject can become dramatically brighter.
Know which dial changes what
Separate flash brightness from ambient exposure. This keeps adjustments intentional and prevents the familiar combination of pale faces against black backgrounds.
Aperture & ISO
Aperture and ISO affect recorded flash brightness. Opening the aperture or raising ISO makes the flash contribution appear brighter.
Shutter speed
Below sync speed, shutter speed mainly changes the room or background exposure. A slower shutter can preserve atmosphere while flash lights the subject.
Distance & modifier
Moving the light changes exposure rapidly. Modifier size, diffusion, flash zoom and bounce surfaces also change efficiency, softness and colour.
Manual power: every full step changes one stop
Moving from 1/8 to 1/4 adds one stop. Lower power usually means faster recycling, longer battery life and a shorter flash burst.
Move from TTL speed to manual consistency
Use TTL to find the exposure while conditions are fluid. When the scene settles, preserve the successful look with fixed manual settings.
Read the movement
Decide whether subject distance and bounce conditions will remain stable.
Start in TTL
Use 0 EV compensation and capture a representative frame quickly.
Judge the skin
Ignore room brightness for a moment. Correct the subject with TTL compensation.
Stabilize positions
Fix camera, light, modifier and subject marks when consistency becomes possible.
Lock manual power
Match the successful exposure, then leave output unchanged across the sequence.
High-Speed Sync
HSS allows shutter speeds above normal flash sync, useful for wide apertures in bright conditions. It does not make the flash more powerful.
Faster shutter access
Control bright ambient light and preserve a wide aperture outdoors.
Reduced flash range
The pulsed output is less efficient, so distance and modifier loss matter more.
Higher battery demand
Expect more heat, slower recycling and greater power consumption.
The practical takeaway
Choose for the conditions in front of you—not for a hierarchy of skill. Deliberate lighting comes from knowing what each mode controls and what it cannot.
Use it for changing rooms, variable bounce paths and moments without a test frame.
Use it when the camera, subject and lights remain fixed.
TTL calculates exposure, but you decide whether fill should be subtle or dominant.
Doubling flash distance costs roughly two stops of illumination.
Use fast shutters when needed, while planning for less range and more battery demand.
Choose the Right Flash Mode in Less Than 10 Seconds
TTL vs Manual Flash: When to Use Each comes down to one question: is the flash-to-subject distance changing? Choose TTL when people or lights keep moving and you need a usable first exposure. Choose manual when positions stay fixed and matching brightness across every frame matters more than automatic adjustment.
| Situation | Better starting choice | Why it works |
|---|---|---|
| Moving child or dancing guest | TTL | Output adjusts as distance changes |
| Wedding reception across several rooms | TTL | Bounce distance and surfaces keep changing |
| Studio portrait with marked positions | Manual | Fixed output keeps frames consistent |
| Product catalog on a tabletop | Manual | White, black, and reflective products receive matching light |
| Formal group standing in one place | Manual | Every expression gets the same exposure |
| One-chance candid moment | TTL | Fast automatic metering improves the first-shot success rate |
| Dramatic three-light portrait | Manual | Fixed power makes light ratios repeatable |
| Event coverage plus a portrait corner | Both | TTL handles roaming; manual controls the fixed set |
Imagine photographing a speaker who walks from the back of a stage to the front. With manual flash, a power level that looks right at 6 metres can become far too bright at 3 metres. TTL recalculates each frame, so it handles that approach more gracefully.
Now place the speaker on a taped mark for a formal portrait. Nothing moves, yet TTL may brighten a frame when a dark jacket fills the view and reduce output when a white shirt appears. Manual power removes that variation. That contrast leads to the first skill worth learning: knowing what TTL measures—and what it cannot judge.

Godox iT32 TTL Camera Flash with X5C Trigger for Canon R6 Mark II, R7, R8
- Interchangeable Magnetic Hotshoe: Switches between camera brands easily
- Dual Hotshoe & Trigger: Functions as hotshoe mount and wireless trigger
- Universal Compatibility: Works with major camera brands and flashes
As an affiliate, we earn on qualifying purchases.
As an affiliate, we earn on qualifying purchases.
Use TTL to Catch Fast Moments Before They Disappear
TTL vs Manual Flash: When to Use Each favors TTL for fast, unpredictable scenes. Through-the-Lens metering sends a low-power preflash, measures the reflected light through the camera, and calculates the main burst. According to Canon’s E-TTL documentation [1], that metering happens immediately before the exposure.
TTL shines at weddings, parties, candid portraits, children’s sessions, and news-style coverage because your distance rarely stays fixed. I might bounce from a white ceiling while photographing guests at one table, turn toward a couple standing closer to a cream wall, and then follow them onto a dark dance floor. The path and loss of the light change every time.
Start at 0 EV flash exposure compensation, inspect skin rather than the room, and adjust from there. If the flash looks blunt or obvious, try −0.7 EV or −1 EV for gentler fill. If a white dress comes out grey because the meter reduced its output, positive compensation can restore the brightness you intended.
TTL calculates exposure, not taste. It cannot decide whether the flash direction flatters a face, whether a green wall will stain the skin, or whether the background should remain dark and moody.
Metering also reacts to whatever dominates the frame. A black suit can encourage extra flash, while a mirror, sequined dress, or white wall can prompt the system to pull back. Reframing the same person may produce small brightness changes even when neither of you moves.
The preflash creates another wrinkle. Some people blink quickly enough that the main exposure catches half-closed eyes, and basic optical slaves may fire too early when they see the metering pulse. In those cases, manual flash or a compatible radio system can solve a problem that exposure compensation cannot.

PHOTOOLEX Camera Flash Speedlite FK300, GN33, Manual S1/S2 Wireless
- Powerful Guide Number: GN33 for strong, stable light
- Multiple Flash Modes: Manual, S1, S2 wireless trigger modes
- Adjustable Power Levels: 8 levels from 1/128 to 1/1
As an affiliate, we earn on qualifying purchases.
As an affiliate, we earn on qualifying purchases.
Switch to Manual When Every Frame Needs to Match
TTL vs Manual Flash: When to Use Each favors manual flash for controlled, repeatable work. You select a fixed output—such as full, 1/2, 1/4, or 1/8 power—and the flash keeps producing that amount until you change the power, zoom, modifier, or distance.
Manual mode is my starting point for studio portraits, food, products, interiors, real estate, and formal groups in one location. Imagine photographing 40 ceramic mugs for a catalog: some are glossy white, others matte black, and one has a silver logo. TTL may respond differently to each surface, but 1/16 manual power stays 1/16 power.
The first few frames take longer because you must establish exposure yourself. Place the light, choose an aperture and ISO, take a test photograph, then adjust power in measured steps. Moving from 1/8 to 1/4 power adds one stop; moving from 1/4 to 1/8 removes one stop.
Manual power behaves like setting an oven temperature for a batch of bread. Once the heat, timing, and tray position work, you leave them alone so every loaf receives the same treatment. In a portrait setup, your flash power is the temperature, the marked subject position is the tray, and the modifier distance is the rack height.
Lower manual power also brings useful side effects: faster recycling, longer battery life, and usually a shorter flash burst. That shorter burst can freeze a splash, a spinning dancer’s clothing, or flour drifting above a table more cleanly, provided ambient light does not record its own blur.
The tradeoff appears as soon as the subject wanders. If someone moves from 2 metres to 1 metre from a fixed light, the exposure can change dramatically. Manual mode rewards discipline: mark the floor with tape, keep the modifier fixed, and ask your subject to return to the light rather than chasing them with power adjustments.
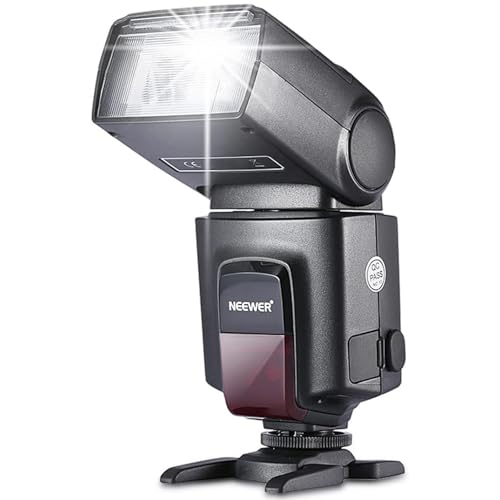
NEEWER TT560 Camera Flash Speedlite Compatible with Canon Sony Nikon Panasonic Fuji DSLR with Universal Single Contact Hot Shoe Mount, Speedlight Compatible with Sony ZV1, NOT for ZV-1F, No TTL
- No TTL or HSS Functions: Manual flash with no TTL or HSS support
- Universal Hot Shoe Compatibility: Fits standard single contact hotshoe cameras
- Manual Output Adjustment: Adjust flash output manually on the unit
As an affiliate, we earn on qualifying purchases.
As an affiliate, we earn on qualifying purchases.
Control Flash Brightness Without Guessing at Every Dial
TTL vs Manual Flash: When to Use Each becomes easier once you separate flash exposure from ambient exposure. Below your camera’s normal sync speed, aperture and ISO affect both flash and room light, while shutter speed mainly changes the ambient light. Flash power and flash-to-subject distance do most of the work on the flash-lit subject.
- Set the ambient mood first. Choose a shutter speed that keeps the room as bright or dark as you want without exceeding normal sync speed.
- Choose aperture for depth of field. A group arranged in two rows may need f/5.6 or f/8, while a single portrait may suit f/2.8.
- Choose ISO with flash power in mind. Raising ISO from 400 to 800 adds one stop to both flash and ambient exposure.
- Add the flash. Use compensation in TTL or fractional power in manual mode to place the face where you want it.
- Check distance and recycling. A small power change cannot rescue a light that is far away, blocked, or still recharging.
Distance changes flash intensity with surprising speed. Under the inverse-square law, doubling the light-to-subject distance reduces illumination to roughly one-quarter, or two stops, before modifiers and room reflections enter the mix. A softbox that gives f/8 at 1 metre will land near f/4 after you move it to 2 metres, all else being equal.
Try this in a small room: expose a seated portrait at 1/16 power, ISO 400, and f/4. Close the aperture to f/5.6 and the flash-lit face becomes one stop darker, so moving to 1/8 power restores it. Slow the shutter from 1/200 to 1/100 second instead, and the room brightens while the flash on the face stays nearly unchanged.
That separation lets you shape a photograph in layers. The shutter controls how much amber lamp glow reaches the frame, while the flash places clean light on the subject. Once you see those layers separately, the camera stops feeling like a box of linked mysteries.

Godox CT-16 Wireless Radio Flash Trigger Receiver Kit,Fit Compatible for Canon Nikon Pentax DSLR Camera Studio 3 in 1 Flash Transmitter and Receiver
- Same Channel Setup: Ensure transmitter and receiver are on same channel
- Easy Setup: Remove transparent film before use
- Wireless Flash Trigger: 433MHz frequency for fast response
As an affiliate, we earn on qualifying purchases.
As an affiliate, we earn on qualifying purchases.
Get Softer Bounce Flash Without Trusting Automation Blindly
TTL is usually the faster choice for bounce flash because it can compensate for part of the light lost on the longer trip from flash to ceiling to subject. It works best when ceiling height, surface color, and shooting distance change as you move. Manual bounce works beautifully when you stay in one spot.
Imagine photographing dinner speeches in a room with a 2.7-metre white ceiling. You tilt the flash behind your shoulder, creating a broad patch of light overhead that falls across the speaker’s face like a soft window. TTL can adjust as you step closer or farther away, though you may still need negative compensation to keep the result natural.
Walk into a bar with a black ceiling and red walls, and the same technique falls apart. The black surface absorbs much of the burst, while the red wall can return warm, rusty light that makes skin look sunburned. TTL can add power, but it cannot turn a poor bounce surface white or move the light to a flattering angle.
- White or pale neutral surfaces usually give the cleanest color.
- High ceilings demand more power and slow recycling.
- Side walls can create attractive direction instead of flat overhead light.
- Strongly colored paint can tint skin and clothing.
- A fixed bounce position is a good reason to switch to manual.
For a formal group photographed from one marked spot, I would test the bounce, switch to manual, and keep the flash head pointed at the same ceiling area. That prevents a white shirt in the front row from changing the output on the next frame. The room remains the same, so the flash should remain the same too.
Watch heat and recycling during repeated high-power bursts. If the flash body becomes hot or recycle time stretches, slow your pace and follow the maker’s burst limits. A missed frame is annoying; an overheated flash shutting down during the key moment is worse.
Build a Hybrid Setup That Keeps Moving Subjects and Background Lights Balanced
A hybrid TTL and manual setup gives you automatic adjustment where distance changes and fixed output where it does not. Put a moving subject’s key light in TTL, then set stationary rim, background, or accent lights manually. This keeps the face responsive while the background remains visually stable.
For an evening portrait on a dance floor, place a manual flash behind the couple at 1/32 power to create a warm rim around hair and shoulders. Keep the on-camera bounce flash in TTL because you will step forward, move sideways, and reframe. The rear flash stays the same distance from its target area, while the key light follows your movement.
Modern 2.4 GHz radio systems often carry TTL commands, manual power settings, group control, and high-speed sync from the camera. Some transmitters also offer TTL-to-manual conversion, sometimes called TCM: you make a successful TTL exposure, convert that reading into fixed manual power, and then shoot a consistent sequence.
That conversion is handy for a portrait station at an event. Let TTL find a close starting exposure while your subject stands on the mark, convert the result, and fine-tune it in manual mode. New guests wearing black, white, or sequins will then receive the same amount of light rather than pulling the meter in different directions.
Compatibility is feature-specific. A flash may fire manually on another camera brand while TTL, high-speed sync, autofocus assistance, or remote group control fails.
Check the camera, transmitter, receiver, and flash as one chain. Firmware can matter when a new camera body changes communication behavior, and a trigger labeled TTL may support only certain brands or models. Test every group before paid work, including compensation, manual adjustment, sync speed, and wake-from-sleep behavior.
This mixed workflow is not a compromise between beginner and advanced technique. It is a clean division of labor: automatic control for movement and fixed control for repeatability. The next trap is knowing when neither mode is at fault because high-speed sync has changed the physics.
Avoid the HSS and Metering Mistakes That Ruin Good Light
TTL and high-speed sync are separate controls: TTL decides how output is calculated, while HSS changes how the flash works above the camera’s standard sync speed. You can use TTL or manual power with HSS, and you can use either mode without it. Confusing them leads to weak output and needless troubleshooting.
A conventional flash burst must occur while the full sensor is exposed. Above normal sync speed—often around 1/200 or 1/250 second—the shutter curtains form a moving slit. HSS sends a rapid series of pulses so that slit receives light across the frame, but the process reduces effective power and range.
Imagine photographing a portrait outdoors at f/1.8 and 1/2000 second. HSS lets you keep that bright aperture, yet a small speedlight in a large softbox may struggle from several metres away. Move the light closer, raise ISO only if the ambient plan allows it, open the modifier, or use a more powerful light.
- Do not expect TTL to choose flattering light placement. Aim and shape the flash before judging exposure.
- Do not leave compensation untouched. Correct TTL when white, black, or reflective subjects fool the meter.
- Do not use manual power carelessly with moving subjects. Distance changes can overwhelm small power tweaks.
- Do not bounce from colored surfaces without checking skin. Automatic exposure cannot remove a green or red cast.
- Do not fire repeated full-power bursts without a pause. Heat buildup and incomplete recycling create missed or uneven frames.
According to Nikon’s Speedlight guidance [2], i-TTL also uses monitor preflashes to determine output, which explains why a basic optical slave may fire before the main exposure. Use a preflash-aware slave mode or radio triggering if that happens. Canon’s E-TTL documentation [1] describes the same broad sequence of preflash metering followed by the exposure burst.
My practical rule is short: choose TTL when distance changes faster than you can adjust, and choose manual when consistency outranks automatic adaptation. If the photograph still looks wrong, check direction, distance, modifier, sync mode, and recycle status before blaming the exposure mode.
Frequently Asked Questions
Is TTL better than manual flash for beginners?
TTL gives beginners faster usable results, especially with moving people and bounce flash. You should still practice manual mode with a stationary subject and fixed light because it shows you exactly how power, aperture, ISO, and distance work together.
Why does my TTL exposure change between photographs?
TTL calculates a new output for every frame, so framing, clothing, background brightness, and reflections can alter the result. Use flash exposure compensation for general correction, or switch to manual power when the subject and light positions stop moving.
Does TTL work when I bounce the flash?
TTL usually works well with bounce flash because it measures the returned preflash light and can compensate for part of the loss. It cannot correct a black ceiling, a strongly colored wall, poor light direction, or a path so long that the flash runs out of power.
Does changing shutter speed change flash brightness?
Below normal sync speed, shutter speed mainly changes ambient exposure because the flash burst is much shorter than the shutter opening. Once you activate high-speed sync, faster shutter speeds also reduce usable flash output and working distance.
Can I use manual flash with a TTL radio trigger?
Most TTL-capable radio systems also provide remote manual power control, though support depends on the exact camera, transmitter, receiver, and flash combination. Test group control, HSS, compensation, and wake behavior before a job rather than assuming every feature crosses brands.
Conclusion
The choice is not automation versus skill. TTL protects your timing when the scene keeps moving, while manual flash protects your consistency when the scene settles down. Start with the mode that matches the distance, then shape the light with direction, bounce, modifiers, compensation, and power.
On your next shoot, give yourself one simple habit: when you stop moving, ask whether the light can stop changing too. Switch to manual if the answer is yes; stay in TTL if the subject is already walking away. The best flash mode is the one that lets you watch the person in front of your lens instead of staring at the back of the camera.
Evergreen bestsellers Picks
bestsellers
As an affiliate, we earn on qualifying purchases.