TL;DR

Get audio and creator gear delivered free with Prime
- Fast, free delivery on millions of items
- Prime Video, Amazon Music and more included
- Member-only deals all year
Speedlight Basics: Getting Your Flash Off the Camera means moving a small flash away from your lens so you can control direction, shadow, and shape. Start with one flash, one trigger, one stand, and one modifier, then balance flash power with ambient light before adding more gear.
The fastest way to make flash look better is to stop firing it from the same place your camera sees the world.
Speedlight Basics: Getting Your Flash Off the Camera is about one practical shift: moving your light away from the lens so faces gain shape, backgrounds gain depth, and shadows stop looking pasted to the wall. I use this on portraits, wedding details, small products, and dark reception corners where available light has gone thin and gray.
You’ll learn the gear you actually need, where to place the flash, how to control exposure, and when to use manual, TTL, bounce, radio triggers, and HSS. No lab drama. Just the moves that work when someone is standing in front of you waiting.
Move the speedlight at least a few feet off the camera axis to create visible shape and reduce flat, straight-on flash.
Start with one flash, one radio trigger, one stand, and one modifier before adding extra lights.
Use manual flash for steady setups and TTL when subject distance changes quickly.
Set ambient exposure first, then add flash until the subject looks shaped rather than blasted.
HSS lets you shoot above sync speed, but it costs flash power, so use shade or closer light when daylight is strong.
Speedlight Basics: Getting Your Flash Off the Camera
Move the flash away from the lens and the picture changes fast: faces gain shape, shadows stop looking pasted to the wall, and backgrounds keep depth instead of collapsing into flat brightness.
Place the light to the side and slightly above eye level for natural portrait shape.
One speedlight, one radio trigger, one stand, and one modifier before adding more lights.
Set ambient exposure first, then add flash until the subject looks shaped rather than blasted.
Even a small move off the camera axis creates visible shadow direction.
Enough reach to place light above eye level and angle it down.
A white umbrella is a simple, forgiving first soft-light tool.
A calm test power for portraits when distance stays steady.
High-speed sync helps in daylight, but the flash works harder.
Direction Makes Light Feel Dimensional
On-camera flash hits the subject from the same angle as the lens, so shadows hide behind the person and the image feels flat. Move the speedlight to the side and the shadows slide across cheeks, clothes, and background surfaces, giving the frame believable shape.
Flat Front Light
Bright forehead, harsh wall shadow, red-eye risk, and very little contour because the light and lens see from the same place.
Off-Axis Flash
A stand placed a few feet away creates side shadow, cleaner separation, and a more natural sense of depth.
Shape, Not Blast
The flash should support the scene, guide the eye, and put brightness only where it helps the picture.
Build the Setup in Five Moves
Keep the first setup deliberately simple. The reliable recipe is a single modified speedlight at 45 degrees, raised slightly above the subject, balanced against the existing room or window light.
Meter the Room
Choose shutter speed, aperture, and ISO for the background mood.
Place the Stand
Start front-left or front-right, close enough for soft light.
Aim Across
Angle the modifier toward the face, not straight at the nearest cheek.
Test the Shadow
Check nose, chin, glasses, and background shadow placement.
Tune Power
Raise or lower flash until the subject has shape without glare.
The Small Starter Kit That Gets You Working
You do not need a studio cart to begin. A modest kit can handle living-room portraits, office headshots, wedding details, and small product photographs.
Manual Fractions
Choose a speedlight that lets you set power like 1/1, 1/2, 1/4, 1/8, and 1/16 for repeatable results.
Radio Beats Optical
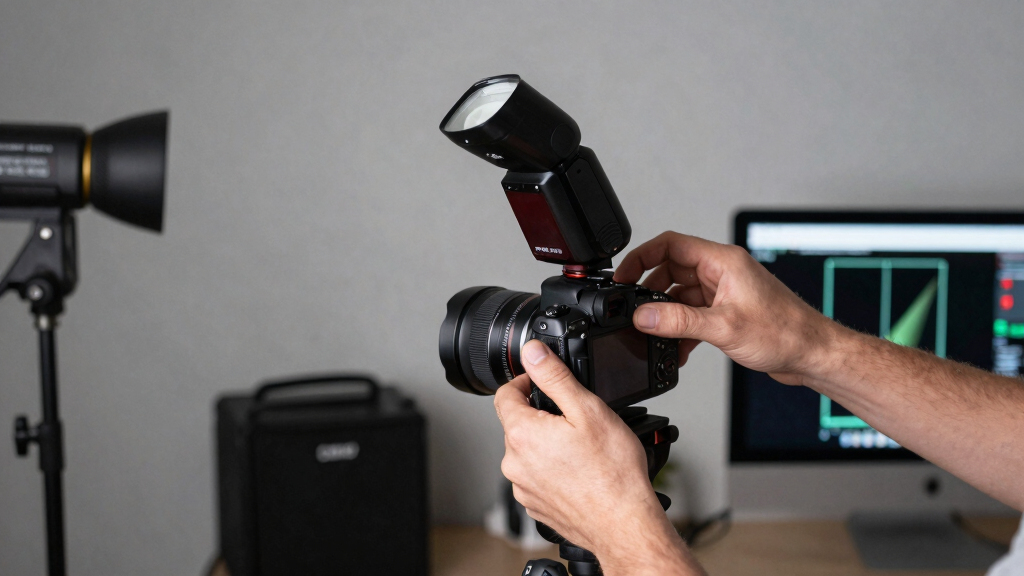
Radio triggering is more reliable because it does not need line of sight between camera and flash.
Stand + Sandbag
Use a stable stand and weigh it down, especially when a modifier can catch air or guests walk nearby.
Umbrella or Softbox
A larger apparent light source softens edges and makes skin less shiny than bare flash.
Swivel Control
A swivel mount lets you tilt the flash, attach a modifier, and aim precisely at the subject.
Watch the Eyes
Raise or rotate the light when glasses catch a white rectangle or catchlights land awkwardly.
Manual vs TTL: Pick the Tool for the Moment
Manual flash is repeatable and calm when the distance stays fixed. TTL is faster when people move, but it can vary as clothing, walls, mirrors, and bright objects fool the meter.
| Mode | Best For | Consistency | Speed | Tradeoff |
|---|---|---|---|---|
| Manual | Headshots, products, posed portraits | ✓ High | ~ Medium | You adjust power when distance, aperture, or ISO changes. |
| TTL | Events, kids, receptions, moving subjects | ~ Variable | ✓ Fast | Exposure can shift from frame to frame. |
| TTL + Compensation | Fast scenes where you still want taste | ~ Good | ✓ Fast | You must watch highlights and ride the flash level. |
| Bare Optical Trigger | Simple line-of-sight practice | ✗ Fragile | ~ Medium | Sunlight, walls, and blocked sensors can stop it firing. |
Shutter, Aperture, ISO, and Flash Each Have a Job
Flash duration is very short, so shutter speed mainly controls ambient light until you hit sync limits. Aperture and ISO affect both ambient and flash, while flash power controls how strongly the subject is shaped.
Natural Balance Zone
When the Light Gets Tricky
Use the simplest control that solves the real problem in front of you. Strong sun, shiny glasses, changing subject distance, and tight rooms each ask for a different move.
Use Shade Before HSS
High-speed sync lets you shoot above sync speed, but it reduces available flash power. Shade and closer light often solve the problem faster.
Let TTL Help
When people move from dance floor to doorway, TTL with flash compensation can keep exposures usable without stopping the moment.
Bounce With Intent
A ceiling or wall can become a large source, but its color and distance will change the quality and tone of the light.
Bring Light Closer
Closer modified light becomes softer. Farther bare light becomes harder, sharper, and more dramatic.
The Safety Rule
Light stands tip easily when a modifier catches air. Add a sandbag or backpack, keep walkways clear, and never leave a raised stand loose around children, pets, or crowded guests.
From Flat Flash to Shaped Portrait
The whole method connects one decision to the next: move the light, enlarge it, balance it, test it, and adjust only what the frame asks for.
Why Moving the Flash Makes Your Photos Look Less Flat
Speedlight Basics: Getting Your Flash Off the Camera starts with direction: light from the camera looks flat because it hits the subject from the same angle as the lens. Move the flash even 3 feet to one side and shadows slide across the face, giving cheeks, noses, clothes, and backgrounds a believable shape.
On-camera flash often creates the classic “deer in headlights” look: bright forehead, sharp wall shadow, and red-eye when the light bounces straight back toward the lens. Off-camera flash breaks that pattern. The light starts to carve instead of blast.
At a family session, I once had five minutes in a beige hallway with ceiling lights that hummed and flickered. I put one speedlight on a stand near the door, aimed it through a small softbox, and the scene changed from office-drab to warm and directional. The flash made a soft pop, and the wall shadow tucked neatly behind the subject.
Off-camera flash is not about making photos brighter. It is about putting the brightness where it helps the picture.
Research in visual perception supports the craft lesson photographers learn quickly: your brain reads shape from light direction and shadow edges [1]. That is why a side-lit portrait feels dimensional while straight-on flash feels flat, even when both exposures are technically correct.
As an affiliate, we earn on qualifying purchases.
The Small Starter Kit That Gets You Working Fast
Speedlight Basics: Getting Your Flash Off the Camera needs less gear than most beginners expect: one compatible flash, one wireless trigger, one light stand, one swivel mount, and one simple modifier. That kit is suitable for a portrait in a living room, a headshot in an office, or a detail photo at a reception.
- Speedlight: Use a flash that lets you change power manually in fractions like 1/1, 1/2, 1/4, and 1/8.
- Wireless trigger: A radio trigger fires the flash without needing a visible path between camera and light.
- Light stand: Start with a stand that reaches around 6 to 8 feet so you can place light above eye level.
- Swivel mount: This lets you tilt the flash and attach an umbrella or small softbox.
- Modifier: A white umbrella, small softbox, or bounce card makes the light larger and softer.
If I had to pack one beginner setup, I’d take a speedlight, a radio trigger, a 33-inch white umbrella, and a sandbag. That sounds modest, but it can make a clean author portrait beside a window or a crisp product shot on a kitchen table.
Safety note: light stands tip easily when a modifier catches air. Add a sandbag or backpack to the base, keep walkways clear, and never leave a raised stand loose around children, pets, or crowded event guests.
As an affiliate, we earn on qualifying purchases.
Where to Put Your Flash for Natural Shape
Speedlight Basics: Getting Your Flash Off the Camera becomes useful when you place the light with intent: start at 45 degrees to the side, slightly above eye level, and angled down toward the face. This position gives you a clean shadow pattern without making the portrait feel theatrical or strange.
- Place the stand beside your subject, about an arm’s length to 4 feet away for portraits.
- Raise the flash above eye level so nose shadows fall gently downward instead of upward.
- Aim the light across the face, not straight into the nearest cheek.
- Take a test frame and check the shadow under the nose and chin.
- Move the light closer for softness or farther away for harder, punchier shadows.
Think of the flash like a window you can carry. A big window close to a face wraps light around skin; a tiny window across the room makes sharper lines. Your speedlight behaves the same way once you add a modifier.
For a quick headshot, I usually begin with the flash just outside the frame on the subject’s front-left side. If glasses catch a bright white rectangle, I raise the light, angle it down, and ask the subject to turn their nose a few degrees away. Small move. Big cleanup.
The key aspects and habits here are simple: watch the eyes, watch the nose shadow, and watch the background. If the shadow looks heavy, bring the light closer or move it more toward the camera. If the face looks flat, move it farther to the side.
As an affiliate, we earn on qualifying purchases.
Manual vs TTL: Pick the Mode That Fits the Moment
Manual flash gives repeatable power, while TTL flash lets the camera meter and adjust flash output automatically. Use manual when the subject and light distance stay steady; use TTL when people move fast, distances change, or you need a usable exposure before the moment disappears.
| Mode | Best For | Tradeoff |
|---|---|---|
| Manual | Headshots, product photos, posed portraits, controlled setups | You must adjust power when distance or aperture changes |
| TTL | Events, kids, receptions, moving subjects | Exposure can vary from frame to frame |
| TTL with compensation | Fast work where you still want taste and control | You need to watch highlights and dial flash up or down |
In a home portrait session, manual is calm and precise. Set the flash to 1/16 power, take a test frame, adjust, then shoot a whole set with matching light. The rhythm feels steady: click, pop, click, pop.
At a wedding reception, TTL can save you when people move from a dark dance floor to a bright doorway. I still ride flash exposure compensation like a dimmer switch, often pulling it down a stop so the flash supports the room instead of flattening it.
According to camera and flash system documentation, TTL metering reads reflected pre-flash data before the main exposure [2]. That makes it fast, but not psychic. White dresses, black suits, mirrors, and shiny balloons can still fool it.
As an affiliate, we earn on qualifying purchases.
How Shutter Speed, Aperture, and ISO Share the Job
Shutter speed controls ambient light, while aperture and ISO affect both ambient and flash exposure. Flash duration is usually very short, so your shutter speed mainly decides how much room light, window light, or sunset color appears behind your subject.
Start near your camera’s normal sync speed, often around 1/160 to 1/250 second, then adjust. If the background looks too dark, slow the shutter to 1/60. If the room looks too bright or messy, raise it back toward sync speed.
Aperture changes the flash brightness on your subject. At f/2.8, the flash feels stronger than it does at f/8, because the lens lets in more light. ISO works the same way: ISO 800 makes both the lamp in the corner and your speedlight appear brighter than ISO 200.
Here is my field habit: I set the ambient exposure first, usually a little darker than the room looked to my eyes. Then I add flash until the subject feels alive. It is like seasoning soup. The room is the broth; the flash is the salt.
- Too much flash? Lower flash power, close the aperture, or lower ISO.
- Background too dark? Slow the shutter or raise ISO.
- Motion blur showing up? Raise shutter speed or ask for a still pose.
- Flash not firing above sync speed? Turn on HSS if your flash and trigger support it.
When HSS Helps and When It Steals Power
High-Speed Sync, or HSS, lets you use flash above your camera’s normal sync speed, such as 1/1000 or 1/4000 second. It helps in bright daylight with wide apertures, but it reduces effective flash power because the flash pulses rapidly instead of firing one full burst.
HSS is wonderful when you want a portrait at f/1.8 in afternoon sun. Without it, you may be stuck at sync speed and forced to close the aperture. With it, you can keep the background creamy while adding a crisp highlight to the face.
The tradeoff shows up fast. A speedlight that works comfortably at 1/8 power indoors may struggle outdoors in HSS, especially through a softbox. The light looks thin, the recycle time stretches, and your batteries warm up.
My practical rule: use HSS for style, not rescue. If the sun is fierce, move your subject into open shade first, then add flash. The flash no longer has to fight noon light like a candle arguing with a stadium lamp.
HSS gives you shutter speed freedom, but it spends flash power to buy it. Use it when the look is worth the cost.
Bounce, Softboxes, and Grids: What Each Modifier Actually Does
Modifiers change the size, spread, and direction of your speedlight. Bounce makes light larger by sending it into a wall or ceiling, a softbox spreads and softens it in a controlled shape, and a grid narrows the beam so spill does not wash across the whole scene.
| Modifier | What It Does | Best Scenario |
|---|---|---|
| Bounce | Turns a wall or ceiling into a larger light source | White rooms, receptions, quick portraits |
| Umbrella | Creates broad, soft light with simple setup | Beginner portraits, small groups, home studios |
| Softbox | Softens light while giving more control than an umbrella | Headshots, products, tight spaces |
| Grid | Focuses light and limits spill | Background separation, dramatic portraits, detail shots |
Bounce is fast, but the wall color matters. A green wall gives green skin. A wood ceiling can make everything feel like old varnish. I love bounce in a white-walled venue, and I avoid it in rooms painted deep red unless I want that color in the image.
A small softbox is my dependable choice for one-light portraits. Put it close and feather it slightly across the face, and skin takes on a smooth, clean glow. You still keep texture in hair, fabric, and eyes.
A grid is the tidy tool. At a reception, I’ll sometimes put a gridded speedlight behind a couple for a rim of light on shoulders and hair. It adds separation without spraying the DJ booth, the exit sign, and every guest at table seven.
The Common Mistakes That Make Flash Look Harsh
Most harsh speedlight photos come from small, direct, misplaced light. The fix is usually practical: move the flash off-axis, make the light source larger, reduce power, and balance it with the room instead of letting flash erase every trace of atmosphere.
- Flash too far away: Move it closer so the modifier appears larger to the subject.
- Power too high: Drop from 1/4 to 1/16 and raise ISO if you need more room light.
- Light too low: Raise it above eye level to avoid spooky upward shadows.
- No test frame: Take one frame before the real moment, then check highlights and shadow direction.
- Ignoring ambient light: Set room exposure first so the flash does not look pasted on.
I see beginners aim a bare flash straight at someone from six feet away, then wonder why the skin looks shiny and the wall shadow looks like a cutout. Add an umbrella two feet from the subject and the same flash becomes kinder. The shadow edge softens, and the face keeps its shape.
Covering important aspects of flash also means knowing when less is more. If a room already has warm lamp light, let some of that amber glow stay. Your flash should lift the subject, not scrub the scene clean.
According to long-running manufacturer guidance on flash sync and metering, flash exposure depends on distance, aperture, ISO, and flash output [2]. That simple chain explains most mistakes. When distance doubles, your speedlight has to work much harder.
A Simple One-Light Setup You Can Use This Weekend
A reliable one-light portrait setup uses one speedlight in a modifier at 45 degrees, slightly above the subject, balanced with the existing room light. Start with manual power around 1/16, ISO 400, f/4, and a shutter speed near 1/125 second, then adjust from the test frame.
- Choose a clean background with a little distance behind your subject.
- Place the flash 45 degrees to one side and slightly above eye level.
- Add an umbrella or softbox and keep it close, about 2 to 4 feet from the face.
- Set camera exposure for the room, usually a bit darker than normal.
- Add flash power until the face looks bright but still natural.
- Check the eyes for catchlights and the nose shadow for direction.
Try this with a friend near a window after sunset. Let a lamp glow in the background, set the room a little dim, and use the speedlight to shape the face. You will hear the soft click-pop rhythm and see the portrait snap into place.
Do not chase perfection on the first frame. Move the stand six inches. Tilt the flash down a little. Rotate your subject’s shoulders. Off-camera flash improves through small physical changes you can see, not mystery settings buried in a menu.
This setup covers the important aspects beginners need most: direction, softness, power, and balance. Once it feels natural, add a second flash for background light or hair light, but only after one light stops feeling slippery.
Frequently Asked Questions
Do I need an expensive flash to start off-camera lighting?
No. You need a flash with manual power control, a compatible trigger, and a safe way to mount it. A simple one-light kit teaches you more than a bag full of gear you cannot place quickly.
Is radio triggering better than optical triggering?
Radio triggering is usually more reliable because it does not need line of sight. Optical triggering can work indoors, but bright sun, blocked sensors, and awkward angles can make it miss frames.
What flash power should I start with?
For indoor portraits, start around 1/16 power at ISO 400 and f/4, then adjust from the test frame. If the light is too bright, lower power or close the aperture; if it is too dark, raise power, ISO, or move the light closer.
Should I learn manual flash or TTL first?
Learn manual flash first if you can practice in a steady setup. It teaches cause and effect clearly. Use TTL when the subject keeps moving and you need the camera to help with changing distance.
Can one speedlight work outdoors?
Yes, one speedlight can work outdoors, especially in open shade or near sunset. In hard midday sun, keep the modifier close, use HSS only when needed, and accept that a small flash has limits.
Conclusion
Getting your flash off the camera is the small move that changes everything: direction becomes a choice, shadows become tools, and your speedlight stops acting like a tiny emergency lamp.
Start with one light, place it close, and watch what the shadows tell you. When the flash makes that quiet pop and the face gains shape, you’ll know you are no longer just adding light. You are placing it.
Fall Picks
fall essentials
As an affiliate, we earn on qualifying purchases.