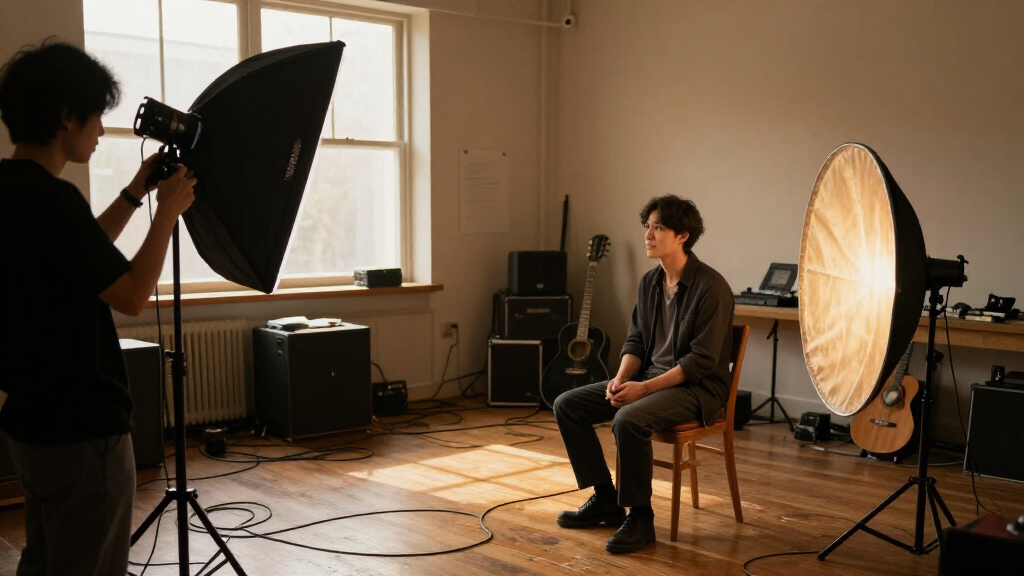
This guide helps beginner photographers choose a studio lighting kit, assemble it safely, and make a first usable lighting setup for portraits or product photos. You will finish with a test image that has controlled exposure, a clear subject, and no unwanted stand or cable hazards. Allow 45-90 minutes, including setup and test shots; time varies with your room and kit.

Get audio and creator gear delivered free with Prime
- Fast, free delivery on millions of items
- Prime Video, Amazon Music and more included
- Member-only deals all year
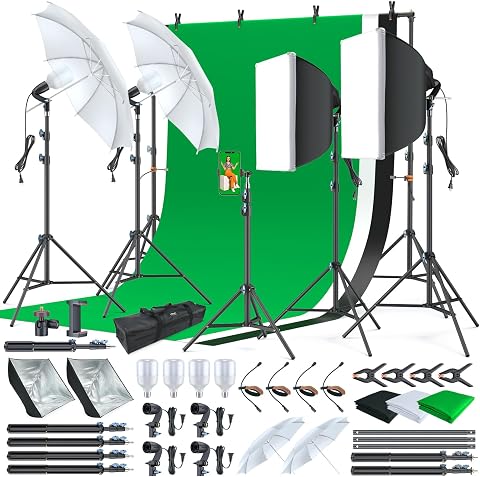
LINCO Photo and Video Studio Light Kit AM169
- ✔ Softboxes: 2, 24 x 24 in
- ✔ Umbrellas: 2, 33 in
- ✔ LED bulbs: 4 x 30W, 5700K, E26/E27 base
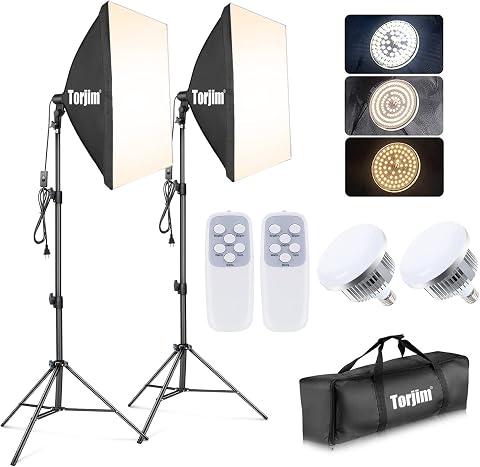
Torjim Softbox Photography Lighting Kit with Two 27 x 27 in Softboxes and LED Bulbs
- ✔ Softboxes: 2, 27 x 27 in
- ✔ Bulbs: 2 x 85W, E26
- ✔ Listed color temperature: 7500K; title also states a broader 3000–7500K range

Torjim Softbox Photography Lighting Kit with 16-Inch Softboxes and 85W LED Bulbs
- ✔ Softboxes: 2, 16 in
- ✔ Bulbs: 2 x 85W LED
- ✔ Color temperature: 3000–7500K
Difficulty: Beginner | Time: 45-90 minutes
What You’ll Need
Tools & Materials:
- Camera with manual exposure controls
- Studio flash kit or continuous-light kit with compatible power supplies
- Light stands and the included reflectors or softboxes
- Camera trigger or sync cable for flash, if required
- Extension cable rated for the lights, if needed
- Light meter, optional
- Sandbags or other stand weights
- A clear indoor workspace
Knowledge:
- Basic camera operation, including shutter speed, aperture, and ISO
- How to mount a camera on a tripod, if using one
- How to follow the lighting kit manufacturer’s assembly and safety instructions
Check what the kit includes before buying or setting up. Some kits need a separate radio trigger, batteries, or a compatible camera shoe adapter. Flash and continuous lights work differently: flash fires briefly when the shutter opens, while continuous lights stay on so you can see their effect in real time. Do not attach an incompatible trigger or cable. Read the kit’s power and assembly instructions, and check that your stands, modifiers, and room can support the equipment.
LINCO Photo and Video Studio Light Kit AM169
The LINCO AM169 earns our top position because it solves more of the practical studio setup than either Torjim kit. Along with two 24 x 24-inch softboxes, it includes two umbrellas, four stands, four daylight-balanced bulbs, a backdrop support, and black, white, and green muslin backdrops. That mix makes it a stronger starting point for portrait sessions or product shoots where a clean, repeatable background matters as much as the key light.Its advantage is breadth, not the biggest softbox: the Torjim 27 x 27-inch pair offers larger soft sources, and the 16-inch Torjim is less involved to set up. LINCO’s 30W, 5700K bulbs are specified as daylight balanced, while the Torjim bulbs are listed at 85W; those ratings do not by themselves tell us which setup produces more usable illumination. We should also expect more assembly and more pieces to store. For a photographer who only needs two lights and no background system, the LINCO may be unnecessary equipment rather than added value.The washable muslin backgrounds and carrying bag support a more complete, portable workflow, but the 24-inch softboxes remain modest in size for full-length portraits or broad coverage. We would choose this over either Torjim when background flexibility and an all-in-one kit matter most; for light quality shaped by a larger source, we would look to the 27-inch Torjim instead.
Pros:
- Includes two softboxes, two umbrellas, four stands, and four bulbs.
- Backdrop support and three washable muslin backgrounds expand portrait and product-shoot options.
- 5700K bulbs provide a specified daylight-balanced starting point.
- Carrying bag has a water-resistant coating for transporting the kit.
Cons:
- Multiple stands, modifiers, and backdrop components require more assembly and storage space.
- The 24 x 24-inch softboxes are smaller than the 27 x 27-inch Torjim pair.
- The supplied details do not state a CRI value or measured light output.
Best for: Photographers starting a small portrait, product, or streaming setup who want lights, modifiers, stands, and backgrounds in one package.
Not ideal for: Photographers who already own backdrops, want the largest softboxes available here, or prefer a fast, minimal two-light setup.
Bottom line: We recommend the LINCO AM169 for photographers who want the broadest ready-to-build studio package, provided they are willing to manage its extra setup.
“We recommend the LINCO AM169 for photographers who want the broadest ready-to-build studio package, provided they are willing to manage its extra setup.”
Torjim Softbox Photography Lighting Kit with Two 27 x 27 in Softboxes and LED Bulbs
When a photographer wants two larger softboxes rather than a bundle of background gear, this Torjim is the most focused choice in the lineup. Its 27 x 27-inch softboxes have more area than LINCO’s 24-inch squares and substantially more than the compact 16-inch Torjim. In practical terms, that extra surface can make it easier to spread softened light across a seated portrait or a small tabletop scene, assuming the lights are positioned appropriately.The kit includes removable diffusers, two 85W bulbs, a carrying bag, and aluminum-alloy stands adjustable from 27 to 74.5 inches. The wide height range offers flexibility for both low product angles and standing subjects. Its heads rotate up to 210 degrees, matching the adjustment range of the smaller Torjim, but the larger modifiers make this the better choice when source size is the main distinction. Unlike LINCO, it does not supply umbrellas, a backdrop stand, or background cloth, so buyers must provide those separately.There is a specification caveat: the bulbs are listed at 7500K, even though the product title refers to a broader 3000–7500K range. We should not assume this kit offers adjustable color temperature based on that discrepancy. That fixed-looking listing may also make matching other lights less convenient. Choose it for larger diffused sources and flexible stand positioning, not as a complete studio bundle or a verified color-tuning system.
Pros:
- Two 27 x 27-inch softboxes provide the largest diffusion area in this comparison.
- Removable diffusers let photographers work with or without an added diffusion layer.
- Stands adjust from 27 to 74.5 inches and softboxes rotate up to 210 degrees.
- Includes two LED bulbs and a carrying bag.
Cons:
- The bulb specification lists 7500K despite the title’s broader 3000–7500K range.
- No umbrellas, backdrops, or backdrop support are included.
- The supplied specifications do not state CRI or measured output.
Best for: Portrait and tabletop photographers who want larger softboxes and adjustable stands but do not need included backgrounds or umbrellas.
Not ideal for: Photographers who need a backdrop system, documented adjustable color temperature, or clearly specified color accuracy.
Bottom line: We would choose this Torjim over the 16-inch model when larger soft sources matter more than a compact footprint, while accepting the uncertainty around color-temperature claims.
“We would choose this Torjim over the 16-inch model when larger soft sources matter more than a compact footprint, while accepting the uncertainty around color-temperature claims.”
Torjim Softbox Photography Lighting Kit with 16-Inch Softboxes and 85W LED Bulbs
The 16-inch Torjim is the compact pick: it supplies two softboxes, diffusers, 85W LED bulbs, stands, and a remote without the backdrop hardware in the LINCO bundle or the larger modifiers of its 27-inch sibling. That makes it a simpler fit for a spare-room portrait corner, video recording, or live streaming, where a smaller lighting footprint may matter more than broad coverage. Its 210-degree adjustable heads help direct the fixtures around a desk or seated subject.Compared with the 27-inch Torjim, the tradeoff is clear: smaller softboxes mean less area for shaping light, so photographers working with wider framing or larger subjects may find the coverage limiting. Compared with LINCO, this kit is less complete but also avoids the extra backdrop and umbrella assembly. Its remote and stated 3000–7500K range offer convenient control, though the product details do not explain the remote’s functions or how precisely color temperature can be adjusted.The biggest caution for photographers is its specified CRI of 80. That figure is a limitation for color-sensitive product work or portraits where subtle skin and material hues matter, and the other two listings do not provide a comparable CRI figure. The kit is also not water resistant, so it belongs in a dry indoor workspace. We would favor it for compact, general-purpose continuous lighting, but not for demanding color-critical work or subjects that need broad, even illumination across a large area.
Pros:
- Two lights, diffusers, stands, and remote are included in one compact kit.
- 210-degree adjustable heads allow flexible positioning.
- Listed 3000–7500K color-temperature range offers more stated flexibility than the other kits.
- Reflective interiors and diffusers are designed to soften and spread the light.
Cons:
- The 16-inch softboxes provide less diffusion area than either the 24-inch LINCO or 27-inch Torjim softboxes.
- Listed CRI of 80 may be limiting for color-sensitive photography.
- Not water resistant, and the supplied details do not clarify remote-control functions.
Best for: Photographers, streamers, and video creators who need a compact pair of continuously adjustable lights for a small indoor workspace.
Not ideal for: Color-critical product photographers, photographers lighting large scenes, or anyone who needs a complete background system.
Bottom line: We recommend this Torjim for small-space, general-purpose lighting, but photographers who need broad coverage or reliable color matching should move up to a larger or better-documented setup.
“We recommend this Torjim for small-space, general-purpose lighting, but photographers who need broad coverage or reliable color matching should move up to a larger or better-documented setup.”
As an Amazon Associate we earn from qualifying purchases.
Before You Start
Choose the subject and clear the area around it. Put the setup on a level floor, away from foot traffic, open doors, and anything that can catch a modifier. Keep lights and cables away from water. Assemble the equipment while it is unplugged or switched off. For flash units, let a recently used lamp cool before changing a bulb or modifier. Avoid looking directly into a bright modeling lamp or continuous light.
Start with one light, not every light in the kit. One source makes it easier to see what each position and modifier changes. Use a room with enough space to move the stand back from the subject; large softboxes need room and may catch air currents. If a stand feels unstable, lower it, spread its legs fully, and add a weight before raising the light.
Step-by-Step Instructions
Step 1: Choose a kit for your subject and camera
Decide whether you will mainly photograph portraits, products, or both, then choose flash or continuous lighting. Flash suits still photography and can overpower some ambient room light, but it requires a compatible trigger and test shots because the light is not visible at full output before exposure. Continuous lights let you preview shadows and are useful for video, but they may need higher ISO or slower shutter speeds. Check the kit’s power, modifier size, included stands, and compatibility with your camera before purchasing or connecting anything.
For a first portrait setup, a single light with a softbox and reflector is enough. A two-light kit gives more control, but it also adds stands, cables, and setup decisions. For small products, a compact softbox or diffusion panel may be easier to position than a large modifier.
Tip: Check that the light uses the trigger type, mount, voltage, and power supply supported by your equipment. Do not assume that accessories from different brands fit.
Check: You can name the subject you plan to photograph, explain why the kit’s light type suits it, and identify any separately required trigger or adapter.
Step 2: Inspect and lay out the equipment
Switch off and unplug the lights. Lay out each head, stand, power cable, trigger, reflector, softbox, and included fastener. Check for damaged cables, cracked fittings, loose stand locks, or bent parts. Read the assembly instructions for unfamiliar mounts. Leave damaged equipment unused until repaired or replaced.
Place the camera, subject, and stands so cables can run along a wall or another low-traffic route. Keep the power outlet accessible. If you need an extension cable, use one rated for the light’s power draw and avoid linking several extensions together.
Tip: Keep small speed rings, rods, and locking knobs together. Missing or mismatched parts can make a softbox unstable.
Check: All needed parts are present and undamaged, and the planned layout leaves clear paths around the stands.
Step 3: Build and secure the first stand
Spread the stand legs fully and place the stand on level ground. Tighten its locks according to the maker’s instructions. Attach the light head while it is off, then tighten the mount and point the stand’s strongest leg toward the direction the modifier will extend. Add a sandbag or suitable weight over the stand leg nearest the load. Keep the stand low while attaching equipment; raise it only after the light is secured.
For a softbox, assemble the modifier using its own instructions and attach it without forcing the mount. A large modifier can act like a sail, so do not leave it unattended in a drafty room. Keep the light head and stand within their rated load limits.
Tip: Do not move a tall stand by pulling it along the floor with the light attached. Lower it first and move it with control.
Check: The stand does not wobble under a gentle check, its locks are tight, and the modifier is firmly attached.
Step 4: Position the subject and key light
Place the subject at least a short distance from the background so shadows do not fall directly behind them. Position the key light about 45 degrees to one side of the camera and slightly above the subject’s eye level. Aim it toward the face or product, then angle the modifier so its center points just past the subject. This can soften the light across the subject rather than creating a harsh, direct beam.
Move the light closer for softer light and a larger apparent source; move it farther away for a more even spread across a larger scene. Keep enough distance to frame the subject without the stand appearing in the picture. For products, check reflections in shiny surfaces and adjust the light or camera angle rather than moving the item repeatedly.
Tip: Start with the light close enough to soften shadows, while keeping the whole subject inside the illuminated area.
Check: The light illuminates the subject, the stand is outside the frame, and the background has enough separation to avoid an unwanted hard shadow.
Step 5: Set a safe starting exposure
Set the camera to manual exposure and choose the file format and focus method you normally use. For flash, begin at the camera’s normal flash-sync shutter speed or slower; check the camera manual for the limit. Set a low ISO, then choose an aperture that gives enough depth of field for your subject. Take a test frame and adjust flash power or aperture in small increments. Do not exceed the camera’s sync speed unless your camera, trigger, and light support high-speed sync.
For continuous light, switch the lamp on and set exposure using the camera’s meter or test frames. Keep shutter speed fast enough to avoid motion blur, then adjust aperture, ISO, and light output as needed. If the image is too dark, raise the light output or bring the source closer before pushing ISO very high.
Tip: For flash, the modeling lamp can help show direction but does not represent the flash exposure exactly. Judge exposure from the captured frame or a light meter.
Check: The test image has detail in the subject’s brightest areas and shadows, and the exposure does not show broad clipping or unexpected motion blur.
Step 6: Connect and test the trigger or continuous light
For flash, switch the unit off before connecting the compatible radio trigger or sync cable. Attach the transmitter to the camera as instructed, turn on the receiver and flash, then take a test frame. If the flash does not fire, check the trigger channel, receiver connection, batteries, and camera sync setting. Keep the shutter at or below the camera’s sync limit unless high-speed sync is supported throughout the setup.
For continuous light, connect the power supply securely and switch the light on. Use the controls on the unit to set output and color temperature if available. Let the light reach a stable output before judging color. Do not touch a hot bulb or use a lamp with a damaged cable.
Tip: Make one change at a time. Changing camera exposure, light power, and light position together makes it difficult to identify what improved the image.
Check: The flash fires consistently when the shutter is released, or the continuous light stays on at the selected output without flicker or a warning indicator.
Step 7: Shape the light and refine the frame
Review the test image at full size. Check the subject’s face or product surface, shadow direction, background, and edges of the frame. If shadows are too hard, bring the softbox closer, increase its apparent size, or add a reflector on the shadow side. If the image is too flat, move the reflector farther away or remove it. For a dark background, increase subject-to-background distance or adjust the background light separately.
For portraits, look for small, consistent catchlights in the eyes and check that facial highlights retain detail. For products, inspect reflective areas for bright spots and distracting reflections. Rotate the softbox or change the camera angle in small steps until the reflection becomes controlled.
Tip: A white reflector brightens shadows; a black card can deepen them. Keep both outside the camera frame.
Check: The subject is clearly lit, shadow detail matches the intended look, and no distracting modifier edges, stands, or reflections appear in the frame.
Step 8: Add other lights only when needed
Keep the first light in place and take another test before adding equipment. Add a reflector for gentle fill, or add a second light for a specific job such as lighting the background or separating a portrait subject from it. Position the second source so its effect does not spill onto the wrong area. Reduce its output if it competes with the key light.
For a multi-light flash setup, change one head at a time and take a frame after each change. Label or record power settings and positions once you get a repeatable result. More lights do not automatically improve a photograph; add one only to solve a visible problem.
Tip: Keep unused lights switched off. This makes it easier to identify which source is causing a shadow, reflection, or color cast.
Check: Each added light has a clear purpose, and turning it off changes only the part of the image it is meant to affect.
Step 9: Secure the final setup and record settings
Check every stand lock, modifier fitting, cable route, and power connection before the shoot. Keep bags and loose equipment out of walkways. Take a final test frame and note the camera exposure, light power, light distance, and modifier position. Save a reference image of the setup if you will need to reproduce it.
At the end, switch off and unplug the lights, allow hot parts to cool, and lower the stands before removing modifiers. Coil cables loosely and pack components as directed by the manufacturer.
Tip: Do not dismantle a hot flash tube, modeling lamp, or continuous-light bulb. Follow the maker’s cooling instructions.
Check: The final test is repeatable, the setup is stable, and the equipment is switched off and packed without pulling or bending cables.
Common Mistakes to Avoid
- Buying a kit without checking trigger, mount, or power compatibility. — Confirm the camera model, trigger type, modifier mount, and power requirements against the product specifications before buying. Identify any accessories sold separately.
- Raising a stand before attaching and securing the light or modifier. — Build the stand low, mount the equipment, tighten every lock, add weight, and raise it gradually. Keep the setup attended and away from drafts.
- Using a shutter speed above the camera’s flash-sync limit. — Check the camera manual and start at the normal sync speed or slower. Use high-speed sync only when the camera, trigger, and flash all support it.
- Changing multiple lighting and camera settings between test shots. — Adjust one variable at a time, then capture another frame. Record settings when the result looks right.
Troubleshooting
Problem: The flash does not fire when you take a picture.
Solution: Switch the equipment off before reseating connections. Check trigger and receiver batteries, matching channels, trigger seating, flash readiness, and camera sync settings. Test the flash with its own test button. If it fires manually but not from the camera, verify trigger compatibility and camera settings.
Problem: The image is too dark or the flash exposure changes between frames.
Solution: Confirm the flash is ready before each shot, the trigger connection is secure, and the subject has not moved outside the light’s coverage. Raise flash power or move the light closer. Check that the shutter speed is within sync limits and that the flash mode matches your camera setup.
Problem: A hard shadow appears behind the subject.
Solution: Move the subject farther from the background, bring the key light closer, or use a larger diffusion surface. Add a reflector if the shadow side of the subject is also too dark.
Problem: The stand tips or the modifier shifts.
Solution: Stop shooting and lower the stand. Reposition it on level ground, spread the legs, tighten the locks, place weight over a leg, and reattach the modifier securely. Do not continue with damaged or unstable equipment.
What Success Looks Like
Your setup is ready when the lights fire reliably or remain steady, every stand and modifier is secure, cables stay out of walking paths, and the camera test shows a clearly exposed subject without unwanted clipping or motion blur. The light direction and shadow quality should match your intended result, and the frame should contain no stand edges or distracting reflections. You should be able to repeat the photograph using your recorded light positions and settings.
Next Steps
Use the test setup for a short series of photographs, changing only one variable at a time. Keep a note or photo of useful stand positions and power levels so you can rebuild the setup later. After the session, switch off and unplug the equipment, let hot components cool, and store modifiers and cables without crushing or sharply bending them. Recheck cables, locks, and mount fittings before the next shoot; stop using any part that becomes damaged or unstable.
Frequently Asked Questions
Should I buy flash or continuous studio lights?
Choose flash for still photography when you want brief, powerful bursts of light and your camera can use a compatible trigger. Choose continuous lights if you also shoot video or want to see lighting changes directly. Continuous lights can require higher ISO or slower shutter speeds, while flash takes test frames to judge exposure.
How many lights do I need to start?
One light and a reflector can handle many portraits and product photographs. Start with one source so you can control its direction and softness. Add a second light only when you need a specific effect, such as a lit background or a rim of light behind the subject.
Where should I place the softbox for a portrait?
Start with the softbox about 45 degrees to one side of the camera and slightly above eye level. Move it closer for softer light, then adjust its angle while checking the face and background in test frames. The best distance depends on the room, subject, and modifier size.
Can I use a studio lighting kit in a small room?
Yes, if you can place stands securely and leave clear walking paths. Use compact modifiers, keep cables routed safely, and position the subject away from the background where space allows. Do not use a large modifier in a spot where it blocks an exit or can be struck by people moving through the room.
Do I need a light meter?
No. A meter can speed up repeatable flash exposure, but you can begin with test frames and your camera’s exposure tools. Review the actual image and adjust flash power or camera aperture in small steps; a meter does not replace checking the result on your subject.
Columbus Day / Indigenous Peoples' Day Picks
long weekend sales
As an affiliate, we earn on qualifying purchases.