TL;DR
Play games included with Prime
Start a Prime free trial and play with Amazon Luna on your devices.
Start playingAs an affiliate, we earn on qualifying purchases.
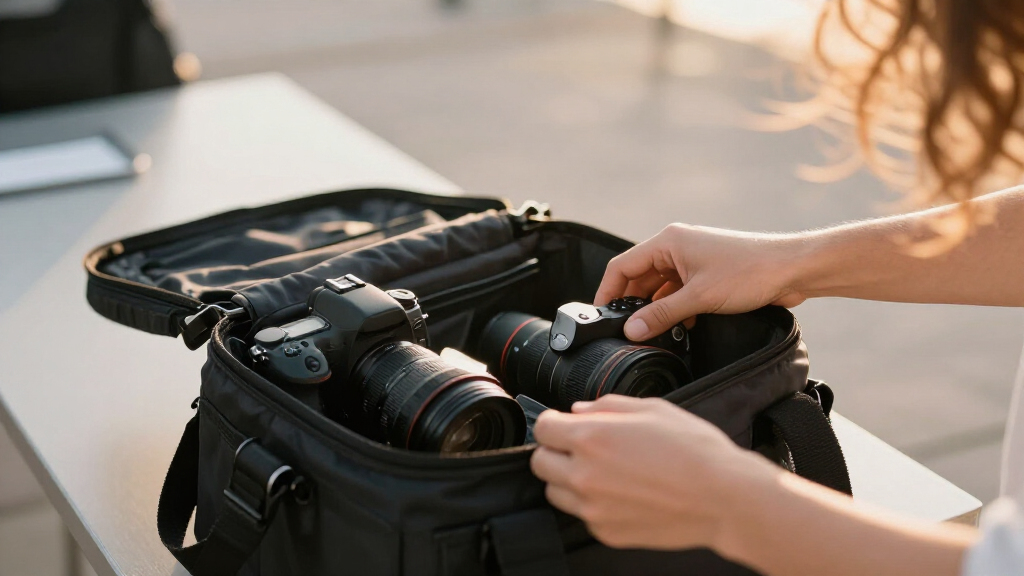
Packing a Camera Bag for a Wedding Day means carrying two working camera bodies, overlapping lens coverage, several tested memory cards, enough charged batteries, dependable lighting, and simple weather protection. Arrange the bag by shooting priority, then test the complete kit before leaving so one failed item cannot stop your coverage.
A wedding camera bag is a portable backup plan, not a padded cupboard for every piece of equipment you own. At 2:14 in the afternoon, when the processional starts early and your main camera suddenly shows an error, the value of a second ready body becomes painfully clear. You need gear you can reach before polished shoes and silk dresses disappear through the doorway.
I pack around the moments that cannot be repeated: the first look, the exchange of rings, a grandmother’s quick embrace, and the couple stepping into a tunnel of sparklers. You will learn how to choose essential camera equipment, build useful lens overlap, manage cards and batteries, and arrange everything so your hands can find it in a dark reception room. The goal is calm, fast coverage from preparation through the final dance.
This guide comes from the practical rhythm of long wedding days: kneeling on damp grass, moving through narrow church aisles, and changing batteries while a band rattles the floorboards. You do not need a mountain of equipment. You need tested tools, clear routines, and sensible backups that keep working when the schedule slips, rain freckles your lenses, or a flash takes a hard knock.
Carry two tested camera bodies with useful lenses mounted, synchronized clocks, matching file settings, and compatible accessories where possible.
Build lens coverage around a standard zoom, a low-light or portrait option, and enough reach for ceremonies rather than packing every lens you own.
Separate fresh batteries and formatted cards from used ones, then check both before the ceremony, speeches, first dance, and off-site portraits.
Place active equipment in the fastest-access compartments and keep rain protection, lighting, cleaning tools, paperwork, water, and food in fixed locations.
Test the complete packed kit before leaving by taking photographs with both bodies, writing files to every active card slot, and firing each flash.
Packing a Camera Bag for a Wedding Day
A wedding camera bag is a portable backup plan, not a padded cupboard. Pack around moments that cannot be repeated, arrange equipment by shooting priority, and make sure one failed item can never stop the coverage.
Build a kit that survives one failure
Wedding coverage depends on three independent systems. A second body protects capture, multiple cards protect storage, and spare batteries protect operating time. Mentally remove one major item: the remaining kit should still finish the assignment.
Second body, already ready
Mount a useful lens, synchronize clocks and match file format, autofocus behavior and copyright settings. Shared mounts and batteries reduce friction.
Several tested cards
Use multiple reliable cards instead of trusting one large card. Test and format each card in its assigned camera only after confirming older files are backed up.
More energy than expected
Charge two days before, top up the night before and label every cell. Keep fresh and spent batteries in different fixed pockets to remove guesswork.
Failure should become an inconvenience—not the end of the assignment.
Take frames on both bodies, write files to every active card slot, play images back and fire every flash before closing the bag.
Overlap the day, not the shelf
A standard zoom handles fast transitions, a bright prime gives low-light and portrait options, and a telephoto preserves discretion during ceremonies. Add a wide lens only when the venue or group plan gives it a clear job.
| Lens type | Best wedding use | What it protects against | Main tradeoff |
|---|---|---|---|
| ✓24–70mm zoom | Preparations, groups, entrances, dance floor | Missing a moment while changing lenses | More weight than a small prime |
| ✓50mm / 85mm prime | Portraits, details and dim rooms | Very high ISO or flat-looking backgrounds | Fixed framing requires footwork |
| ✓70–200mm telephoto | Ceremony, speeches and candid reactions | Standing too close during private moments | Large, heavy and conspicuous |
| ~Wide-angle lens | Venue views, packed floors and large groups | Running out of space in tight rooms | Faces stretch near frame edges |
Crop-sensor equivalent: a lens around 16–55mm provides a field of view similar to a 24–70mm full-frame zoom.
Distance on one shoulder. Speed on the other.
In a candlelit chapel, a 70–200mm captures reactions from the back while a 35mm or standard zoom covers the couple rushing down the aisle.
A routine that still works when you are tired
Long delays, guest arrivals and extra candid coverage consume capacity quietly. A fixed card-and-battery routine replaces hurried guesses with simple physical actions.
Charge and label
Number every battery and card so any unreliable item can be identified later.
Test in camera
Write, play back and confirm both active card slots before departure.
Fresh stays open
Unused media and power always live in the same quick-access pocket.
Used gets closed
Move spent items immediately; never return them to the fresh pocket.
Review before events
Check before ceremony, speeches, first dance and off-site portraits.
Fresh pocket
Charged batteries face upward. Formatted cards remain in their cases.
Used pocket
Spent batteries face downward. Exposed cards go into a closed compartment.
Pack by shooting priority
Gear must be reachable before polished shoes and silk dresses disappear through a doorway. Give every item a permanent address, with active equipment closest to your hands.
Four access zones
The most time-sensitive tools belong nearest the opening. Support items can sit deeper, but their locations must remain consistent all day.
Active capture
Two bodies with lenses mounted, spare active lens and fresh cards.
Lighting
Tested flash, trigger, diffuser and a dedicated set of batteries.
Protection
Rain covers, microfiber cloth, blower and lens hoods.
Day survival
Timeline, shot list, venue notes, water, food and emergency items.
The departure standard
Capture, storage, power, lighting and protection must all pass before the bag leaves home.
Preparation creates calm coverage
Every packing decision should connect directly to a moment, a risk or the speed needed to keep photographing.
Pack light enough to move. Pack deeply enough to recover.
Two ready bodies, useful lens overlap, disciplined media and power, dependable lighting, simple weather protection—and a complete test before leaving.
Build a Kit That Survives One Failure
Packing a Camera Bag for a Wedding Day starts with independent backups for the camera, storage, and power systems. Carry two working bodies, several tested cards, and more charged batteries than your normal estimate requires. If one item fails during the vows, you should be able to keep photographing within seconds rather than opening a troubleshooting menu.
My practical test is simple: I mentally remove one major item and ask whether I can still finish the assignment. If the main body locks up, the second body must already accept a useful lens. If a card reports an error, another formatted card should sit in the same pocket every time. According to PhotoMocha [1], backup gear and advance preparation are central parts of wedding coverage because equipment problems arrive without caring about the timeline.
A second camera body should be charged, time-synchronized, and configured before you leave. Match the date, time zone, file format, autofocus behavior, and copyright information across both bodies. During one ceremony, I have moved from a silent mirrorless body to my backup after a control dial became erratic; matching controls and settings kept the change quiet and nearly invisible.
Your backup does not have to duplicate every specification of your main camera. It does need to produce files you trust in the venue’s likely light and work with at least part of your lens kit. A compatible lens mount and shared battery type make the bag lighter, while different battery systems demand clearly separated chargers and labeled cells.
Pack so one failure becomes an inconvenience, not the end of the assignment.
Before closing the bag, mount a lens on each body and take several frames. Check autofocus, card writing, flash communication, and image playback. That short rehearsal catches a loose battery door or forgotten card while you can still fix it at home, not while the registrar calls everyone to their feet.
As an affiliate, we earn on qualifying purchases.
Choose Lenses That Cover the Day Without Dead Weight
Packing a Camera Bag for a Wedding Day works best with overlapping lens coverage, not a row of lenses that all solve the same problem. A standard zoom handles fast changes, a bright prime helps in dim rooms, and a telephoto keeps you discreet during ceremonies. Add a wide lens only when the venue or group plan gives it a clear job.
A 24–70mm zoom is the working center of many full-frame kits because it can move from a room-wide preparation frame to a waist-up portrait without a lens change. On a crop-sensor body, a lens around 16–55mm offers a similar field of view. The tradeoff is weight: a bright professional zoom can feel like a brick by the eighth hour.
| Lens type | Best wedding use | What it protects you from | Main tradeoff |
|---|---|---|---|
| Standard zoom | Preparations, groups, entrances, dance floor | Missing a moment while changing lenses | More weight than a small prime |
| 50mm or 85mm prime | Portraits, details, low-light rooms | Very high ISO or flat-looking backgrounds | Fixed framing requires footwork |
| 70–200mm telephoto | Ceremonies, speeches, candid reactions | Standing too close during private moments | Large, heavy, and conspicuous |
| Wide-angle lens | Venue views, packed dance floors, large groups | Running out of space in tight rooms | Faces stretch near the frame edges |
Imagine a candlelit ceremony in a stone chapel. A 70–200mm lens lets you photograph a tearful parent from the back without crossing the aisle, while a 35mm or standard zoom on your second body covers the recessional as the couple rushes toward you. That pairing gives you distance and speed without opening the bag.
Prime lenses bring bright apertures and a lighter feel, but they can slow you when the room changes quickly. I enjoy an 85mm prime for portraits because it gives skin gentle detail and turns distant leaves into soft green circles. For confetti, crowded preparations, or a lively dance floor, I prefer the flexibility of a zoom.
Pack each lens with both caps, a hood, and a known place in the bag. Leave novelty lenses at home unless they serve a planned photograph. Your shoulders will notice every unused kilogram long before the cake is cut.
camera lens organizer for wedding photography
As an affiliate, we earn on qualifying purchases.
As an affiliate, we earn on qualifying purchases.
Use a Card-and-Battery Routine You Can Follow Under Pressure
Packing a Camera Bag for a Wedding Day requires a fixed media-and-power routine that still makes sense when you are tired. Start with empty tested cards and full labeled batteries, separate unused items from spent ones, and check both at planned points in the schedule. A repeatable system prevents hurried guesses during the ceremony or speeches.
- Charge every battery two days before the wedding, then top them up the night before.
- Test each memory card in the camera that will use it and format it in that camera only after confirming older files are backed up.
- Label batteries and cards with small numbers so you can identify a troublesome item later.
- Place fresh items in one pocket and move used items to a different, closed pocket immediately.
- Check power and remaining capacity before the ceremony, speeches, first dance, and any off-site portrait session.
During a summer wedding, a delayed ceremony can turn a planned 45-minute wait into two hours of guest arrivals and candid photographs. That quiet extra coverage consumes both power and card space. If you packed only for the written timeline, you may reach the vows with a blinking battery symbol and less room than expected.
Dual card slots can record the same image to two cards, creating in-camera storage redundancy. Set that behavior deliberately rather than assuming the camera remembers your preference after a firmware update or rental. Better autofocus and higher-resolution sensors have made modern cameras highly capable, but their larger files can fill cards faster [2].
I prefer several medium-capacity cards over placing the entire wedding on one enormous card. Spreading the day across cards limits how many photographs sit on one physical item, though every card swap creates a brief handling risk. Make changes during a lull, keep the camera pointed down to reduce falling dust, and close the card door before moving.
Bring the correct chargers even when you expect your batteries to last. If the reception venue offers a safe power location, a clearly marked charger can restore used cells during dinner. Keep it away from guest walkways, hot catering equipment, spilled drinks, and any socket the band or venue staff may need.
camera battery and memory card storage case
As an affiliate, we earn on qualifying purchases.
As an affiliate, we earn on qualifying purchases.
Arrange Your Bag So the Next Tool Is One Hand Away
Packing a Camera Bag for a Wedding Day should follow shooting priority: cameras and active lenses belong at the quickest access points, while chargers and rarely used items can sit deeper. Give every object one permanent location, orient lenses consistently, and keep tiny accessories in closed pockets. You will work faster because your hands learn the layout.
At a reception, the room often drops from warm window light to a dim amber glow within minutes. The coordinator announces the speeches while cutlery clinks and chairs scrape the floor. If your flash is beneath a rain cover, snack, charger, and spare strap, you lose reaction photographs while digging through layers of equipment.
I divide the bag into three practical zones. The active zone holds a second body, the next lens, fresh batteries, and fresh cards. The support zone carries a flash, trigger, cleaning kit, and compact rain cover. The bottom zone takes chargers, cables, a small LED light, and anything reserved for a planned portrait.
- Top or side opening: second body, ready with a useful lens.
- Fast pocket: fresh batteries and formatted cards in separate holders.
- Padded center: lenses standing upright with rear caps facing the same direction.
- Sealed pocket: used cards, kept away from empty cards.
- Outer compartment: rain cover, microfiber cloth, and water-resistant pouch.
Do a tactile test after packing. Close your eyes and reach for a battery, card holder, and cleaning cloth without rearranging anything. You may need to work in the sharp silence of a church or behind a dark DJ booth, where a familiar layout beats a phone flashlight.
Balance matters as much as access. Keep dense items close to your back and avoid loading one side with every heavy lens. If you use a shoulder bag during active coverage, store the larger transport bag in a locked room or another location approved by the venue and coordinator.
As an affiliate, we earn on qualifying purchases.
Prepare for Rain, Dust, Darkness, and Sudden Lighting Changes
Your wedding bag should protect both the assignment and the equipment when conditions change. Carry a fitted rain cover, clean cloths, a blower, at least one dependable flash, and a simple way to soften or direct its light. Check the forecast, venue rules, and ceremony restrictions before choosing larger supports or remote lights.
Rain rarely arrives as a cinematic curtain. More often, it begins as fine silver dots that settle on the lens hood while the couple stands beneath dripping trees. A camera rain cover, absorbent cloth, and spare dry microfiber cloth let you keep working, while a water-resistant bag cover protects the gear waiting behind you.
Weather sealing helps, but it does not make a camera waterproof. Keep compartment openings brief, wipe equipment before returning it to the bag, and never seal soaking-wet gear beside dry lenses. After the wedding, let damp covers and cloths dry away from the cameras so trapped moisture does not leave a sour smell or encourage corrosion.
For dark receptions, pack an external flash with spare batteries and verify that it communicates with both bodies. A small bounce card or compact modifier can soften direct light, though a white ceiling often creates cleaner, broader illumination. A ceiling painted red or covered in dark timber will tint or swallow bounced light, so test before the first dance.
A monopod or tripod can help with long exposures, but many ceremonies restrict where supports may stand. Drones face even tighter limits involving the venue, weather, local flight rules, insurance, and guest privacy. Treat an aerial setup as separate planned equipment, never as something you casually pull from the bag beside a crowd.
Bad weather changes your working method before it changes your camera settings.
On dusty farm tracks or windy beaches, change lenses inside a vehicle or sheltered doorway when possible. Use a blower for loose grit; rubbing sand with a cloth can drag hard particles across the front element. That faint scraping sound is one you never want to hear.
Pack the Small Items That Keep the Schedule Moving
The most useful non-camera items are the ones that preserve time, communication, and your ability to keep working. Carry the wedding timeline, contact details, shot list, water, compact food, basic personal care, and a modest emergency pouch. These small items help when transport runs late, clothing catches, or dinner arrives hours after your last meal.
Keep the schedule in two forms: a phone copy and a folded paper copy inside a dry pocket. Mark addresses, parking instructions, travel time, group-photo combinations, and any rule set by the officiant. At one church wedding, a printed note reminding me that photography from the center aisle was restricted saved an awkward correction seconds before the processional.
Your emergency pouch can hold safety pins, tissues, blister plasters, stain-removal wipes, and double-sided clothing tape. Offer them carefully and let the wearer or a member of the wedding party handle clothing repairs when appropriate. Store liquids in a sealed pouch away from cards, batteries, and camera bodies.
Bring water in a bottle that locks securely, plus food you can eat quickly without greasy fingers. A banana, oat bar, or simple sandwich is easier around equipment than orange cheese dust or melting chocolate. Weddings often stretch past 10 or 12 hours, and low energy makes small decisions feel heavy.
Wear supportive shoes and pack a spare pair if the schedule includes wet grass, gravel, or hours on a hard dance floor. A light layer can help in cold churches, while sunscreen and a hat may matter during outdoor portraits. Personal comfort is not vanity; it keeps your movements steady and your attention on the couple.
Run through any final questions for a couple or coordinator several days beforehand. Ask about restricted areas, private guests, surprise events, flash rules, parking, meal timing, and secure storage. These are important aspects of the day that no lens can solve once the schedule is moving.
Frequently Asked Questions
What are the must-have lenses for wedding photography?
A standard zoom such as a 24–70mm covers preparations, groups, entrances, and much of the reception on a full-frame camera. Add a bright 50mm or 85mm prime for portraits and dim rooms, plus a telephoto when you must photograph ceremonies from a respectful distance.
Do I really need two camera bodies for a wedding?
Yes, a second working body is the safest standard for paid wedding coverage because the day cannot pause for a camera failure. Keep it charged, fitted with a useful lens, and set to the correct file format so you can switch within seconds.
How many batteries and memory cards should I pack?
Base the amount on your tested camera use, file size, weather, video workload, and the length of coverage, then add a safe margin. For a long wedding, I carry several charged batteries and multiple tested cards, with fresh and used items stored in separate holders rather than trusting one large card or one spare battery.
Should I use one large camera bag or a smaller working bag?
A larger bag works well for transport, while a smaller shoulder bag, belt system, or harness can keep active gear close during coverage. Store any unattended equipment in a locked or approved secure location, never beside an open doorway or a busy guest table.
How should I protect camera equipment at a rainy wedding?
Use a fitted camera cover, bag cover, lens hood, and several dry cloths. Wipe wet equipment before placing it back in the bag, keep damp fabric separate from dry gear, and change lenses under shelter rather than exposing the camera opening to rain.
Conclusion
Pack against failure, then remove anything that has no clear job. Your final bag should let you continue after a camera fault, card problem, empty battery, burst of rain, or darkened reception room. Test both bodies, format verified cards, charge and label batteries, review the schedule, and place every item where you can find it without thinking.
When the wedding begins, the bag should fade into the background. You should hear the soft click of a shutter, see confetti flare white against a dark suit, and stay close to the people rather than worrying about equipment. Build the routine at home so your attention remains on the one thing no backup can recreate: the moment happening in front of you.
Fall Picks
fall essentials
As an affiliate, we earn on qualifying purchases.