
TL;DR

Get audio and creator gear delivered free with Prime
- Fast, free delivery on millions of items
- Prime Video, Amazon Music and more included
- Member-only deals all year
A reflector redirects existing light from the sun, a window, or a flash; it does not produce light. Start with a white surface, place it to bounce light into the shadows, then adjust its distance and angle while checking your subject’s expression and the whole frame.
The cheapest light in your camera bag may be the one that makes the biggest difference: a panel that doesn’t produce light at all. A reflector redirects light you already have, turning a bright window or patch of sun into gentle fill for the shadow side of a face.
I reach for a reflector when a portrait looks a little too contrasty, a product disappears into its own shadows, or a bright sky leaves someone’s eyes looking dim. You don’t need a studio or a second flash. You need to notice where the light comes from, then give it somewhere useful to go.
This guide explains which surface to use, how to place and angle it, and how to work safely when you’re shooting alone outdoors. You’ll also see when a reflector helps—and when it can’t replace a light source.
A reflector redirects existing light; it cannot brighten a scene without a source such as the sun, a window, or a flash.
Start with white for natural-looking fill, then try silver for stronger light or black when you want deeper shadows.
Move the reflector closer for stronger fill and adjust its angle to control where the reflected light lands.
Compare test frames with and without the reflector so you can spot flat lighting, unwanted highlights, or brighter background distractions.
Secure reflectors and stands outdoors; a large panel can catch wind even when it feels light in your hands.
What a reflector does to the light in your frame
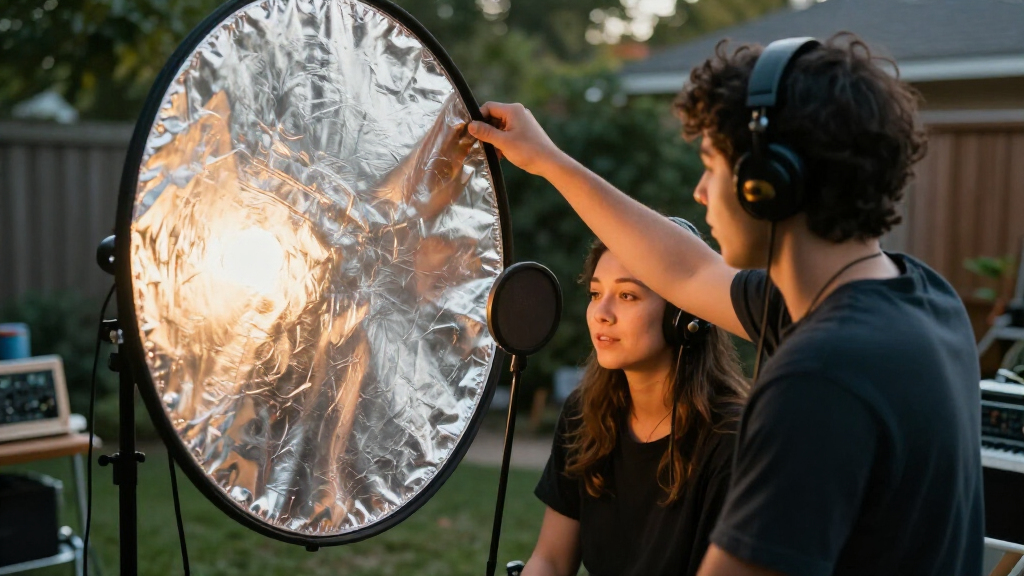
Using Reflectors starts with one simple fact: a reflector redirects light that already exists, rather than generating its own. Point a white panel toward a sunlit window and angle it toward a subject, and it sends some of that window light back into the shadows. The result can brighten a cheek, reveal detail in a dark sleeve, or add a small glint to the eyes.
I think of a reflector as a light’s detour sign. The sun or window supplies the light; the reflector changes its route. That distinction matters: in a dark room with no useful light source, a reflector has nothing to bounce. A flash or LED can provide light, and the reflector can then shape it.
For example, imagine photographing a person beside a large window. The window lights the side of their face nearest the glass, while the far cheek falls into shadow. A white reflector opposite the window sends some light back across the face, lifting the shadow without erasing its shape.
That balance is the point. Good fill keeps depth while making the darker areas easier to read. Too much reflected light can flatten a portrait, so take a test frame with the reflector and one without it. The comparison tells you whether you’ve improved the photograph or simply made every part of the face equally bright.
Products Worth Considering

Bose SoundLink Flex Bluetooth Speaker (2nd Gen), Portable Waterproof Speaker, Black

Sonos Era 100 Wireless Smart Speaker, Black

Jackery HomePower 3600 Plus Portable Power Station, 3584Wh, 3600W
As an affiliate, we earn on qualifying purchases.
Choose the reflector surface that fits your light
Using Reflectors gets easier when you match the surface to the look you want: white gives gentle fill, silver returns stronger light, gold adds warmth, black subtracts light, and translucent fabric softens direct sun. The surface changes the character of the result, so start with the one that gives you the most control rather than the most dramatic effect.
A white surface is usually the most forgiving choice for portraits. It brightens shadow detail without pushing a strong color cast onto skin. Silver reflects more light, which can help on a cloudy day or in a dim corner, but its punchier highlights may make your subject squint. Gold warms the reflected light; use it carefully, since too much can make skin look orange.
Black is a different tool: it absorbs light rather than reflecting it. Photographers call this negative fill, and it deepens shadows for a moodier, more sculpted look. A translucent panel also works differently: place it between harsh sun and your subject, and it diffuses the light instead of bouncing it back.
Here’s a practical comparison. If you’re photographing a child on a sunny lawn, white fill can gently lift the shadow under the eyes; silver may feel too intense. For a product on a cloudy windowsill, silver can add a crisp highlight. For a dramatic portrait near a bright window, black on the shadow side can preserve contrast.
| Surface | What it does | Good starting use |
|---|---|---|
| White | Returns soft, neutral fill | Natural portraits and indoor window light |
| Silver | Returns brighter, punchier fill | Weak light or a stronger highlight |
| Gold | Adds warm color | A subtle warm accent when it suits the scene |
| Black | Absorbs light for negative fill | Deeper shadows and stronger contrast |
| Translucent | Diffuses light passing through it | Softening direct sun |
Place a reflector so the shadows brighten, not the whole scene
Using Reflectors well means looking at the light source first, then placing the panel where it can send light into the darker side of your subject. Position, angle, and distance matter more than the reflector’s price or size. A small adjustment can move a bright patch from an eye to a cheek—or out of the frame entirely.
- Find the source. Identify the direction of the sun, window, or flash. Notice which side of the face or object receives the least light.
- Place the reflector near that shadow side. Start opposite or slightly beside the source, aimed toward the area you want to lift.
- Begin with white. It gives you a soft, neutral result that is easy to judge.
- Adjust distance and angle. Move the panel closer for stronger fill, then tilt it until the light lands where you want it.
- Check the subject and frame. Watch for squinting, bright background patches, and reflections that distract from the subject.
- Take a comparison frame. Make one without the reflector and one with it; keep the version with better detail and shape.
Here’s how that looks in practice. When I photograph someone in open shade beside a bright sidewalk, the ground may already bounce light upward. I’ll hold a white reflector just below and in front of the shadow side, then tilt it until the eyes brighten without making the underside of the chin glow.
There’s no universal distance to memorize. A reflector near the subject generally gives stronger fill; moving it away softens its effect. The source, surface, and room all change the result, so judge the light through your camera rather than relying on a fixed measurement.
Make harsh sunlight softer without losing the outdoor feel
Using Reflectors in bright sun can mean bouncing light into shadows or softening the sun before it reaches your subject. Those are different jobs: a reflective surface sends light toward the person, while a translucent panel sits between the sun and the person to diffuse it. Pick the approach based on what looks uncomfortable or overly contrasty in the frame.
At midday, direct sun can carve hard-edged shadows beneath the nose and eyes. A translucent panel held overhead or just out of frame softens that direct beam, much like a thin cloud passing over the sun. If you instead put a silver reflector in front of someone’s face, you may brighten the shadows—but the reflected beam can be harsh and uncomfortable.
For a family portrait in a sunny park, I’d first look for open shade beneath a tree or beside a building. If the faces still look dark, I’d try white fill from the brighter side. I’d ask everyone to look toward the camera while I watch their eyes; if they squint or turn away, I’d move the reflector farther off-axis, use white instead of silver, or stop bouncing direct sun at them.
Comfort is part of good lighting. A technically bright face is not a win if the subject can’t hold a relaxed expression. Check the background too: reflected light can brighten a wall, grass, or another person and pull attention away from the face. A small shift in angle often fixes it.
Use a reflector for products, food, and small scenes
Using Reflectors isn’t limited to portraits; the same light-bouncing trick can reveal texture in food, products, still life, and close-up subjects. A reflector can lift a dark edge or soften a shadow while keeping a simple window-lit setup intact. For small scenes, even a sheet of white card can do the job.
Say you’re photographing a cup of coffee on a kitchen table near a window. The window creates a bright rim on the cup, but the side facing the room looks muddy. Place a piece of white foam board opposite the window and angle it toward the cup. The board returns a little light to the dark side, revealing the ceramic’s curve without flattening the rim highlight.
With food, watch for shine. A silver reflector can create a sharp glint on a spoon or oily sauce, while white card often gives a gentler lift. For jewelry or glossy packaging, move the reflector in small increments and watch the reflected shape in the surface. The bright rectangle you see may be the reflector itself, not a flaw in the object.
In macro work, a small reflector can brighten a tiny shadow beneath a leaf or insect, but it must sit close enough to affect the subject. Keep it out of the frame and avoid disturbing the scene. For video, a white reflector can provide quiet fill without adding another powered light or fan noise.
Work solo without letting the reflector take over
Using Reflectors alone is practical when the panel is light, the scene is calm, and you can keep it in position. A stand, clamp, or assistant helps when you need a steady angle, but outdoors a large reflector can catch wind like a sail. Secure it carefully and never assume a light stand will stay upright just because the air feels still.
For a self-portrait near a window, I might lean a small white board against a chair just outside the frame. That setup is simple and stable. For a full-length portrait outdoors, I’d ask an assistant to hold the reflector or use a properly weighted stand, then keep the panel low enough and angled so a gust cannot pull it loose toward the subject.
Foldable five-in-one reflectors bundle white, silver, gold, black, and translucent surfaces in a portable kit. That’s convenient when you want options, but you don’t need a special kit to learn the basics. A white foam board is one of the most affordable ways to test fill indoors; a light-colored wall can work too, although it may add a color cast.
Wind, traffic, and people moving through the scene can change your setup quickly. Keep stands away from walkways, secure their legs, and ask someone to help if the panel is large or the weather is gusty. A reflector should make the photograph easier—not become the main event.
Know when a reflector helps—and when you need a light
Using Reflectors works only when useful light is available to redirect. A reflector can soften contrast, brighten shadows, and add a catchlight, but it cannot illuminate a dark room by itself. Think of it as a way to shape light, not a replacement for the sun, a window, a flash, or an LED panel.
On a bright day, a reflector can send sunlight into the shadow side of a face. In a small product setup, it can return window light to the far side of a bottle. But if you’re photographing a moving subject at night, the reflector has no strong source to redirect; you’ll need a flash, LED, or another source of illumination.
Even when a light source exists, fill has a tradeoff. More reflected light can reveal detail, but it can also reduce contrast and make the scene feel flat. A black surface may be the better choice if the face needs deeper shadows. The goal isn’t to make every part of the frame equally bright; it’s to control which details the viewer notices.
Modern LED panels and compact flashes give you more control over brightness and direction, while a reflector remains a useful, simple companion. I often test with ambient light first, then decide whether a reflector gives enough control. If the scene needs more light than the existing source can provide, I add a powered light rather than asking the reflector to do a job it cannot do.
Frequently Asked Questions
What does a reflector do in photography?
A reflector redirects existing light toward a subject to brighten shadows, soften contrast, or create a catchlight. It does not produce light, so it needs a source such as the sun, a window, or a flash.
Which reflector color should a beginner use?
Start with white for soft, neutral fill that is less likely to make skin look unnatural. Silver returns stronger light, while gold adds warmth and can look too orange if you use too much.
How close should I hold a reflector?
There is no fixed distance because the source, surface, and scene all affect the result. Move it closer to make the fill stronger, then change its angle until the light lands where you want it.
Can I use a reflector by myself?
Yes. A small reflector can lean against a chair or sit in a clamp for a stable indoor setup. Outdoors, use a stand carefully or ask for help; a large panel can catch wind and tip equipment over.
Can a reflector replace a flash or LED light?
Not when the scene lacks usable light. A reflector only redirects light that is already there, so it works best as a simple way to shape sunlight, window light, or light from a flash or LED.
Conclusion
A reflector is simple, but it isn’t automatic: the surface and position shape the result. Start with white, aim it at the shadow side, and adjust until the light lifts detail without wiping away the scene’s natural depth.
Next time a portrait looks too contrasty, try moving a piece of white card into the light before reaching for another lamp. You may find the best light in your kit is the one that simply sends the sunlight back where you need it.